Hi!

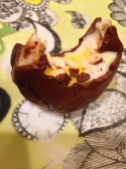
I’ve been wanting to make a vegan chocolate cream egg since…well…every year I’ve been vegan. This year I finally decided to take action.

I bought an egg shaped mold from a craft store and everything. However, I found a recipe on one of my favorite blogs, Hell Yeah It’s Vegan which does not require a mold (and I think comes out better if you don’t). Please check the blog out beyond this recipe. It’s amazing!
Originally I just made some simple adjustments to the recipe. Instead of using yellow and red food coloring, I made the yellow out of water and powdered turmeric. I also changed the method a bit, instead of using two disks I used one and just free-styled the yellow part of the egg by placing it in the center and wrapping the white part around it and shaping it into an egg shape. It was actually really easy in terms of making candies and other stuff.
The chocolate I used was Equal Exchange Fair Trade chocolate chips which I am really passionate about buying from now on. Not only are they conflict/child labor/slave labor free and on the Food Empowerment Project chocolate list, but they’re also the best tasting chocolate and worked like a dream.
But I was annoyed that I was making these with Earth Balance, which has palm oil in it, and corn syrup, which is often gmo and not organic (genetically modified). So I had to totally revamp the recipe. It works just as well if not better. The updated recipe is below!
Of course, these are also gluten free and also nut free (if you don’t consider coconut a nut!)
Chocolate Creme Eggs–vegan, gluten free, palm oil free, fair trade, organic
Ingredients:
- 1/2 cup plus 2 tbsp brown rice syrup
- 1/4 cup plus 2 tbsp refined coconut oil (solid) –plus 2 tsp for the chocolate
- 2 tsp vanilla extract
- 1 tbsp water
- 3 cups organic/gluten free powdered sugar
- Ground turmeric and water, as needed
- 8 oz (or more, just use the full bag) fair trade, vegan chocolate chips
Directions:
- In a stand mixer, cream the brown rice syrup, coconut oil, vanilla extract, and water together.
- Slowly incorporate the powdered sugar into this mixture, blending until well combined. If it is hard to mix add a small amount of water, no more than an 2 additional teaspoons.
- Place a small amount of the mixture into a small bowl (a third or less of it), and sprinkle the turmeric powder and a small amount of water (you do want this to get a little runny), use a small whisk or spoon to stir it together until it all incorporates and is a bright yellow color. It will be hard to combine at first.
- Cover both bowls and place them in the refrigerator for an hour or more. If you are short on time you can place them in the freezer for no more than 30 minutes.
- Cover two cookie sheets with parchment or wax paper.
- With a small spoon, place little blobs of the yellow mixture onto the tray. You want to aim for about 15 nickel size pieces.
- Then shape the white mixture into 30 flat egg shaped discs and place on the other tray.
- Place the white ones in the fridge and the yellow in the freezer for 20-30 minutes.
- Take one white disc, place the yellow blob and put it in the middle, then place another white disc to form a sandwich. Smush together and then shape by rolling in between your hands into an egg shape. Continue on with the rest of them. It’s okay if some of the yellow is oozing out, it gets better looking results that way.
- Place again in the freezer for a half hour (or more).
- Melt the chocolate with 2 tsp coconut oil in the microwave or a double boiler.
- Dip the frozen eggs fully into the chocolate one by one, placing on a cookie sheet with a fresh sheet of parchment paper or wax paper to set. I have found that the best method is to use a spoon to roll the egg in the chocolate and then carefully take out of the chocolate, letting the excess drip off back into the chocolate, and then placing onto the tray. They will not be perfect, you may have some drips that deform the egg shape. Once you let them set you can break those off a little bit.
- Place in the refrigerator or freezer to set fully. I like to keep a big batch of them wrapped in foil in the freezer, and when there is a day that I want one, I place it in the fridge for a few hours, let it sit out for a little longer at room temperature, and then dig in! They are so good.


