Vegan MoFo 2017 Day 6: Vegan Cheese is Real (rainbowy) Cheese

Hi, it’s Fluffy the Vegan Unicorn here,

I hope you’ve enjoyed our posts up to now. I hope you realized how important some of the topics are for discussion and to be aware of as we continue towards making a better world for ourselves and animals. I know some of it can be hard to learn about and hear/read, but I feel it is very necessary to address before we can have a magic rainbow unicorn party across the land and seas.

The remainder of this week’s theme posts will be more lighthearted and less serious. Tomorrow I will go back a bit to the initial few days’ sentiments, freeing ourselves of guilt and shame over food and our bodies, and share my vegan dessert food pyramid. On Sunday I will be sharing a unicorn worthy salad, in case that’s more your speed. Unicorns like to make everyone’s different tastes happy.

Today is keeping with MoFo’s Daily theme, Vegan Cheese is Real Cheese. Just because the cheese is dairy free doesn’t make it any less real. Who is to say what cheese really is, anyways? The FDA? USDA? Some kind of patent office? I don’t know, but they fail us all the time.

Last night I inspired Laura with my magic energy to create for me a creamy vegan mac and cheese sauce made of rainbows. While the recipe will still be tweaked a bit further after this post is shared, it is at least, edible and quite a beauty.

The recipe starts by making cashew cream and boiling cauliflower and onions and blending in some other seasonings and nondairy milk. Then you separate the sauces into 5 portions and add color!

This recipe uses all natural powders such as beet for red, turmeric for yellow and orange, and butterfly pea tea powder for blue. Most of these are easy to find, except the butterfly pea tea powder. It also uses fresh spinach blended into the sauce for the green. Laura considered using spirulina but she and I don’t like the taste of it, so she opted for doing the spinach instead.

What even is butterfly pea tea powder? Butterfly pea tea powder comes from Thailand where a type of gorgeous blue flower grows. They make it into tea powder. It is caffeine free and does not have much of a taste. Laura bought it on Amazon because the other websites she found it on were out of the US and charged a lot of taxes and such. Make sure you get the powder and not the dried leaves, although I suppose if you have a good food processor or spice grinder you could make it yourself. A little ends up going a long way, so don’t worry if you see the package and think it is small.

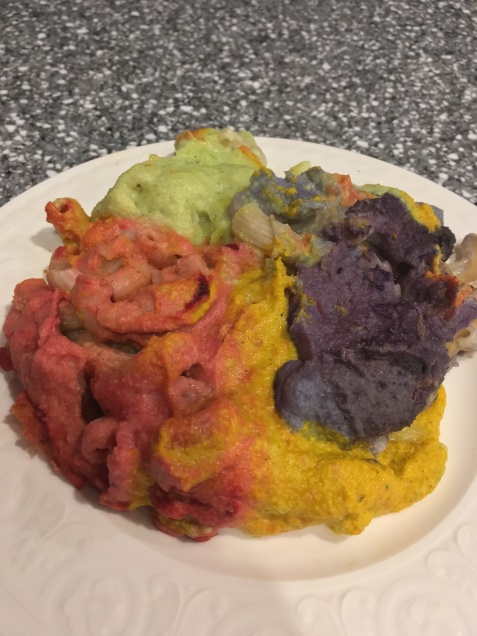
Anyways, without further ado, may I present you my magical rainbow vegan mac and cheese:

IMG_5180

Ingredients:

  • 1 small head of cauliflower, chopped into pieces, stem and leaves removed
  • 1 small onion, chopped roughly
  • 1 cup raw cashews soaked in water overnight
  • 1 cup water
  • 2 tbsp potato starch
  • 1 tablespoon white miso or chickpea miso
  • 1 teaspoon garlic powder
  • 1/2 cup nutritional yeast
  • 1 tablespoon lemon juice
  • 2 cups unsweetened plain nondairy milk
  • 1 teaspoon salt
  • 1/2 teaspoon black pepper

For the red sauce:

  • 1/2 tablespoon beet powder

For the yellow/orange sauce:

  • 1/2 tablespoon turmeric powder

For the green sauce:

  • A handful of baby spinach

For the blue sauce:

  • A little less than 1/2 tablespoon butterfly pea tea powder

For the purple sauce:

  • 1 teaspoon beet powder and 1 tsp butterfly pea tea powder


  • 1 lb elbow pasta, gluten-free if necessary

Directions:

  1. Boil cauliflower and onion in water for 10 minutes or until soft.
  2. Blend cashews and water in a blender until smooth.
  3. When the cauliflower and onions are as soft as my unicorn mane, drain them, rinse under cold water, and add to the blender along with the cashew cream.
  4. Add all ingredients up to the nondairy milk. You may need to slowly add the milk instead of putting it all at once to prevent an ugly overflow mess in your blender. Blend until creamy and smooth.
  5. Meanwhile, cook the pasta according to package directions. Preheat the oven to 350 degrees F.
  6. Now for the magic part. Separate the sauce into 5 equal portions as best as you can, leaving one portion in the blender.
  7. Blend the spinach into the sauce that’s in the blender until it becomes a light, natural shade of green.
  8. Stir in the powders to each individual portion one by one until they become vibrant and brightly beautiful.
  9. When the pasta is cooked, grease a casserole or lasagna dish and pour the pasta inside.
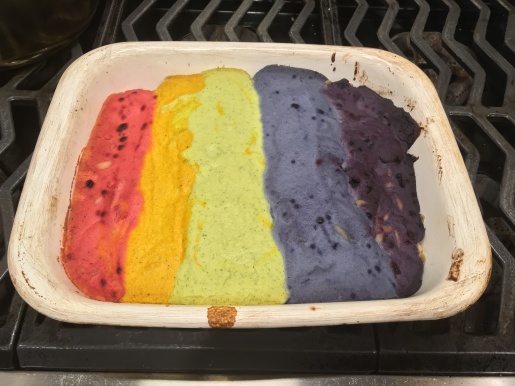
  10. Spread out each color of the rainbow in stripes in order of the handy acronym ROY G BIV (except we are not doing the orange and indigo). To make it easier, you may want to start by placing a stripe of the red to the far left first, and then doing the purple to the far right so you know how much space you have for the other colors in between. It would make us all sad if your rainbow was missing colors.
  11. Cook the pasta in the oven for 20-25 minutes.
  12. When serving, try to get a taste of all the colors. Just don’t swirl them too much or they become a muddy, poopy, un-unicorn ugly, gross color.
  13. Enjoy this savory rainbow of vegan cheezy goodness!

IMG_5184


Hi! A recipe for the best vegan mashed potatoes ever and some soy curls.

Okay, so I’ve been meaning to make mashed potatoes out of cashew cream, and finally did. The results are amazing. I need to share it with you, alongside an air fryer soy curl recipe. Put these two with some green veggies and maybe some cornbread if you want, and you have a whole meal!

img_1535

Mashed potato recipe:

Ingredients:

  • 4-5 large potatoes of choice, peeled and chopped
  • 1 cup raw cashews, either soaked in water overnight or boiled with water covering them for 15 minutes
  • 1 cup water
  • 1 tsp salt
  • 2 tbsp vegan margarine
  • 2 tbsp nutritional yeast
  • 1 tbsp dried or fresh chives
  • Salt and pepper, to taste

Directions:

  1. Boil the cashews if necessary. Allow to cool.
  2. Boil the potatoes in a pot of water (just enough to cover them). I start a timer once the water boils for 15 minutes, and they’re almost always ready for me after that. If you’re not sure, test to make sure a fork can smoothly go into them before you stop boiling them.
  3. Blend the cashews, water, and salt in a blender while the potatoes are cooking. Set aside. You want the cream to be smooth, not chunky, so make sure you blend for long enough to achieve this. I do think it works better when you boil the cashews as opposed to soaking them.
  4. When the potatoes are cooked, drain the water.
  5. Place back in the pan. Mash together with the vegan margarine and cashew cream.
  6. Fold in the nutritional yeast, chives, and salt and pepper as desired.

Enjoy the delicious creaminess. They taste even better when you reheat them the next day.

For the air fried soy curls, here is what I did:

Ingredients:

  • 2 cups soy curls soaked in water with vegan chickun broth or veggie broth
  • 2 tbsp soy sauce or gluten free tamari, added to the soaking broth
  • 1 tbsp liquid smoke, also added to the soaking broth
  • 2 tsp oil
  • 1/2 cup gluten free Bisquick mix
  • Seasoning as desired, I sprinkled some cajun seasoning on top before placing them in the air fryer

Directions:

  1. Soak the soy curls for 15 minutes.
  2. Drain (but don’t rinse!)
  3. Coat the soy curls in the oil, then sprinkle on the Bisquick mix.
  4. Stir around a bit until the soy curls are completely coated.
  5. Place in the air fryer for 12 minutes at 350 degrees F.
  6. Enjoy along side the mashed potatoes with your favorite dipping sauces.

Hope everyone is having a wonderful February so far!

Vegan and Gluten Free Pizza Waffles!

This latest invention was so good! It kind of reminded me how I remember Domino’s Pizza’s Cheesy bread used to taste, in terms of its texture. I might need to try duplicating that flavor profile as well…

But here are the pizza waffles.

IMG_1264.JPG

And here is the recipe for them!

Ingredients:

  • 1 bag Bob’s Red Mill pizza crust mix
  • 1 package yeast (included in the pizza crust mix bag)
  • 2 eggs worth of set egg replacer (I used Ener-g)
  • 1 tbsp salt-free Italian herb blend
  • 1 1/2 cup warm water plus 2 tbsp
  • 3 tbsp olive oil
  • 28 oz can crushed tomatoes, preferably without citric acid in the ingredient list
  • 3 tbsp vegan white sugar
  • 1 tbsp hulled hemp seeds
  • 2 tbsp nutritional yeast
  • 1/2 tsp salt
  • 1/4 tsp ground black pepper
  • Vegan cheese (I used a mix of Daiya mozzarella and Follow your heart cheddar)
  • Other toppings (such as onions, vegan pepperoni, sliced olives, mushrooms, artichoke hearts, etc)

Directions:

  1. Pour the gluten free pizza dough flour mix into a large bowl. Mix in the Italian herb blend.
  2. In another large bowl, mix together the yeast and warm water in a large bowl and set aside for five minutes until the yeast dissolves.
  3. Prepare the egg replacer, also let sit while the yeast is dissolving.
  4. Place the oil and egg replacer into the yeast and water and whisk.
  5. Pour the flour mixture into the yeast mixture and stir until well combined and a dough forms.
  6. Cover and let sit for twenty minutes to rise.
  7. Warm up your waffle oven and turn your oven to 350 degrees F.
  8. When the dough is ready, spray the waffle iron with oil and place some dough into the iron…pat down and don’t use too much dough, as I had trouble sometimes flipping over my iron. If that happens, it’s okay, you can still make them, just keep it upright and let it cook inside at a medium temperature for about 4-5 minutes before taking out.
  9. Place your waffles on a greased oven tray.
  10. Make the sauce by mixing together the crushed tomatoes, sugar, hemp seeds, nutritional yeast, and salt and pepper.
  11. Place some sauce on top of each waffle.
  12. Cove with cheese and desired toppings.
  13. Bake for 15 minutes.
  14. Enjoy the deliciousness!

Air Fryer Experiments

Hi!

As I mentioned in my last post, I bought an air fryer on sale. What is an air fryer, you ask? Well, it’s basically a healthier version of a deep fryer. It fries food with hot air instead of oil.

Personally, I am still figuring out what works and doesn’t work with it and trying to perfect temperatures and cooking times. I have found that using a lot of liquid batter without any kind of dry coating over it does not work so well. It says you can make donuts in it, but I have no clue how that’d work. I have not tried cooking french fries yet, but I really want to, just haven’t yet.

So far I have fried some soy curls using this recipe here. Those came out excellent, I think I cooked them at 350 for about 10 minutes. I also tried defrosting some Gardein chicken scallopini, coating it in watered down Neat egg substitute coated with vegan/gluten free rice crispy-esque cereal. That was okay, but not that exciting even though I had high hopes.

Then, when I botched a bunch of battered cauliflower, I came up with a splendid idea. But I didn’t have any more cauliflower, so I tried it with tofu. It’s supposed to be like coconut coated fried shrimp, but is made with tofu (and someday I need to try it with cauliflower, too!)

fullsizerender

Here is the recipe for it:

Coconut Crusted Air Fried Tofu

Ingredients:

  • 1 cup chickpea flour
  • 1/2 cup cornstarch
  • 1/2 tsp baking powder
  • 2 tsp salt
  • 3/4 cup water
  • 1/2 cup vodka or unflavored soda water/seltzer
  • 2 tbsp peanut or vegetable oil
  • one bag sweetened shredded coconut flakes
  • sweet chili sauce for dipping
  • 1 block tofu, preferably frozen, thawed, then pressed for 20 minutes

Directions:

  1. Combine flour, cornstarch, baking powder, and salt in a medium-sized mixing bowl.
  2. Whisk in the water, vodka/soda water until a liquid, medium thickness batter forms. Water it down if necessary to be the desired thickness, but it should stay fairly thick.
  3. Cut tofu into smallish rectangles.
  4. Place some of the sweetened coconut into a dish.
  5. Dip the tofu in the batter, then into the coconut.
  6. Delicately place in the air fryer tray.
  7. Air fry for 10 minutes, 350 degrees F or slightly lower if you don’t want it as browned as I did. May take some experimentation as I believe air fryers can vary quite a bit.
  8. Use sweet chili sauce to dip in, and serve with a generous helping of veggies!

I’m sure I’ll discover some new tips and tricks about air fryers soon!

So check back here for those.

Until then, or until another recipe creation strikes!

Take care! xo


“Milking the almonds” and making crackers

almond milk jar.JPG

Have you ever heard the joke about vegans, that says “the most difficult part about being a vegan is waking up at 5 a.m. to milk the almonds”? I have always found it rather funny, although now that I have actually made my own almond milk (!), I find it funnier.

After Christmas, I visited Sur La Table, where I got a really good deal on an appliance I’ve wanted for awhile now, an air fryer (more on that in a later post!) While I was there, I came across a nut milk bag, which had a recipe and procedure on the back. I had to try it. I wondered how hard it would be to make.

Honestly, the hardest part was waiting 24 hours while the raw almonds soaked in water. The rest was a breeze. Basically, you soak a cup of almonds in water, rinse off and drain, then blend the almonds with 2 cups of fresh water for 2 minutes. I also added a half tablespoon of vanilla extract into it, and next time I am going to add some liquid stevia. Then, you take a large bowl and position the bag inside so that you can pour the almond and water mixture into the bag. The almond milk will start to seep through the bag into the bowl. Once the mixture is in the bag, you tighten the drawstring and start squeezing the bag from above. You continue to squeeze until you have gotten as much of the liquid out of the bag as possible.

This leaves you with the rich, creamy almond milk in the bowl, and a bag full of almond pulp. You can place the almond milk in a jar and place it in the fridge (it will separate a bit, but you just need to shake it up before drinking or using in recipes). As far as what to do with the almond pulp, there are so many recipes online for what you can create with it! I ended up making sweet crackers! They’re the best gluten free crackers I have had in a while. I can’t wait to make some that are savory rather than sweet, though!

almond-crackers

Here is the recipe for the crackers:

Ingredients:

  • almond pulp left over from the above almond milk-making description
  • 1 tbsp sugar (a vegan liquid sugar would work well too, such as maple syrup or agave)
  • 1/4 tsp salt
  • 1/2 tsp vegan butter flavoring
  • 1 tsp vanilla extract
  • 3 tbsp coconut oil, melted

Directions:

  1. Preheat oven to 350 degrees F.
  2. Mix together almond pulp and other ingredients in a bowl with a wooden spoon.
  3. On a piece of parchment paper on top of a cookie sheet, roll the dough into a ball. You may need to knead it a bit with your hands first.
  4. Place another piece of parchment paper over the dough ball and flatten with your hands a bit. Then roll it out to a thin layer, between 1/8″-1/4.”
  5. Take off one side of the parchment paper, leaving one piece of parchment on the cookie sheet with the rolled out dough on top. This was a challenge for me…I was adapting this from a recipe that didn’t explain this part that clearly and I had to repeat this several times. The dough gets rather soft and sticky, so be careful and patient.
  6. Using a pizza cutter, cut the dough into even squares in a checker pattern. The crackers do not need to have space between them yet. Leave them next to each other as they are. You will be flipping and separating them later. It will be impossible to do at this point.
  7. Bake for 20 minutes. It’s possible that you may need to check to see if they are beginning to brown earlier than that. If they are (checking after 10-15 minutes), separate and flip them with a spatula. Bake for another 5-10 additional minutes (or more if necessary…do not let them get too golden or brown).
  8. Voila! Experiment with other flavors, adding spices or herbs, etc. Cinnamon would be a good addition for this recipe.


Gluten Free, Vegan Thanksgiving Lasagna

IMG_0574.JPG

Hey, I’ve been having a rough time lately. I’m aware I have not been posting much. I finally made an original recipe to share with you all.

I came up with this idea for Thanksgiving because it’s easy to transport for a long car ride, easy to reheat, and has a little bit of everything. Also, since I cannot eat the vegan Thanksgiving roasts like Tofurky and such because they’re made out of pure gluten, I figured this would be even more delicious and satisfying for me.

This recipe contains butternut squash, kale, walnuts, caramelized onions, and vegan ricotta, as well as gluten-free lasagna noodles.

It uses two packages of Kite Hill ricotta, which is a pretty big splurge but so worth it if you can get it. If you can’t, it works with some firm tofu, or you can make a cashew ricotta too.

Here it is:

Ingredients:

  • 4 cups chopped butternut squash
  • 4 tbsp extra virgin olive oil, divided
  • 4 small Vidalia onions, cut into rings
  • 1 tbsp brown sugar
  • ¾ cup vegetable broth
  • ½ tsp salt
  • ¼ tsp pepper
  • ½ tsp ground nutmeg
  • 1 clove minced garlic
  • ¼ cup nutritional yeast
  • 16 oz chopped kale
  • 3 cups water
  • 1 ½ cup walnuts
  • 2 packages Kite Hill ricotta cheese
  • ½ cup non dairy milk of choice
  • 1 package Tinkyada Brown Rice Lasagne Noodles (the best gluten free pasta brand, in my opinion, and I’ve tried a lot)


Directions:

  1. Place butternut squash in a large saucepan and cover with water.
  2. When water is boiling, set a timer for 15-20 minutes. Remove from heat when the squash is soft.
  3. While the butternut squash is boiling, prepare the caramelized onions. Place 2 tablespoons olive oil in a large frying pan with a cover. Toss the onions in the oil. Keep on medium heat (you may have to lower it later) for 10-15 minutes, stirring every so often. When browned, add in the brown sugar, stir, and remove from heat. Set aside for assembly of the lasagna later.
  4. When the squash is cooked, drain the water and place back into the pot. Mash the squash with a potato masher until smooth.
  5. Stir in the vegetable broth, salt and pepper, nutmeg, garlic, and nutritional yeast.
  6. Prepare the kale by boiling three cups of water in a large covered pot. When boiling, add the kale and cover. Stir every so often until all the kale is wilted, for about 5 minutes.
  7. Prepare the walnuts by placing them in a food processor and blend until pasty. If you like, you can add some additional seasonings to the walnuts before blending.
  8. Prepare the lasagna noodles according to the packaged directions and preheat the oven to 350 degrees F.
  9. Combine the ricotta with the nondairy milk in a medium sized bowl.
  10. Drizzle the remaining two tablespoons of olive oil onto a large casserole or lasagna pan.
  11. Place a layer of noodles on the bottom, followed by half the butternut sauce, half the ricotta, half the walnuts, and all of the kale. Repeat in the same order except this time, place on top with the onions instead of the kale for the second layer.
  12. Cover pan with foil and cook for 30 minutes. Uncover and heat for an additional ten minutes (or less depending on how it’s looking)
  13. Allow it to cool slightly before digging in.

img_0584

I hope you have a lot to be grateful for!


Buffalo Soy Curls Recipe and a review of Daiya’s Blue Cheese dressing

Whew, this summer has been so busy! So much happening in my life right now.

Girls Rock camp starts on Monday and I am super excited to help feed people there.

Today I was in the grocery and came across Daiya’s new salad dressings. I was intrigued by the blue cheese one. I never really liked blue cheese, and I hated chunky versions of the dressing. I only liked it if it was smooth. But I decided to purchase it on a whim, and then suddenly had the great idea to make something buffalo style to accompany it.

I came up with a recipe for buffalo soy curls.

IMG_9023

The recipe is as follows:

Ingredients:

  • 1 bag Butler Soy Curls
  • Water to cover soy curls
  • 1/4 cup chickpea (garbanzo bean) flour
  • 2 tbsp nutritional yeast
  • 1 tsp garlic powder
  • 1 tsp onion powder
  • 1/4 tsp black pepper
  • 1 bottle Frank’s Red Hot sauce

Directions:

  1. Soak soy curls in a bowl covered with water for 10 minutes.
  2. Turn oven to broil.
  3. Drain soy curls.
  4. Place flour, nutritional yeast, garlic and onion powders, and pepper in a ziplock bag.
  5. Toss soy curls into ziplock bag.
  6. Spray a wide-rim baking sheet sprayed with cooking oil.
  7. Dump out soy curls out of bag and spray the tops of the soy curls with oil.
  8. Place in the broiler for about  5 minutes (watch them carefully, every oven broils slightly different, you may require more or less time).
  9. Toss, flip, or stir soy curls around a bit. Place back in the broiler for 2 minutes.
  10. When the soy curls are starting to get crisp and slightly brown, take out of the broiler and pour the hot sauce on top.
  11. Broil for another minute, then take out of the oven.
  12. Serve with celery and vegan blue cheese.

IMG_9025

REVIEW OF THE DAIYA BLUE CHEESE DRESSING:

Despite my reservations, I was quite impressed. It’s been ages since I’ve had the real thing, but once I tasted it I had to re-check the ingredients to make sure Daiya hadn’t pulled a fast one on me. It’s very convincing and there’s no chunkiness. Woohoo! It’s perfect for taming buffalo stuff.

Hope your summer is going well too!

Gluten Free Green Smoothie Waffles!

Hello, I’m sorry I’ve been fairly inactive lately. I’ve been focusing on graduate school and another blog of mine, streamoflaura.net, as well as dreaming up a concept for a youtube channel! I’ll try my best to keep you posted on all of that.

Here’s a new recipe I recently created though! There are plenty of green smoothie pancakes (although I haven’t found a good gluten free one yet), but as far as I could tell, no green waffle recipes! So, I made it!

IMG_7201

Ingredients:

  • 2 cups non dairy milk of choice
  • 1 banana
  • 1 serving of vegan vanilla protein powder (I used Aloha)
  • 2 cups baby spinach
  • 1/2 cup sweet white rice flour
  • 1 cup buckwheat flour
  • 1 tbsp tapioca starch
  • 1 tsp xanthan gum
  • 1 tsp ground cinnamon
  • 1 tsp vanilla extract

Directions:

  1. Preheat waffle iron accordingly.
  2. Place ingredients in a blender and blend until smooth. You may need to scrape the sides with a rubber spatula several times to ensure everything mixes properly.
  3. Spray iron, and scoop or pour out about 1/4 of the batter. Cook in your waffle making appliance according to directions, waffle irons vary.
  4. Makes about four waffles.
  5. Serve and enjoy.

Vegan Poutine Recipe

IMG_7500

Hi!

I am slowly making my way through the backlog of stuff I’ve been meaning to post! Soon you’ll also get to hear about a delicious raspberry cake batter smoothie I made and adventures in vegan Ethiopian cooking (a cookbook review).

Not too long ago I really wanted some comfort food, and I had been contemplating using the block of Daiya cheddar cheese I had in my fridge for poutine for awhile. So, I finally did it.

The gravy was spot on, but next time I will melt the cheese a little bit more on top of the fries in the oven so that when I pour the gravy on it all it will melt even better.

Here is the recipe:

Ingredients:

  • 6 tbsp Earth Balance or refined coconut oil
  • 1/4 cup gluten free or regular flour (I used brown rice flour)
  • 2 cloves garlic, minced
  • 3 cups No Beef Broth (from the Happy Herbivore cookbook if you have it, or from here)
  • 1 cup vegan unchick’n broth, or vegetable broth–It’s fairly easy to find vegan unchick’n broth powder–several companies make it and I’ve even found variations of it in dollar type/discount stores near me! Just mix 1 tbsp broth powder with one cup water or veggie broth! Happy Herbivore also has a recipe for making your own broth powder
  • 2 1/2 tbsp cornstarch mixed with 2 1/2 tbsp water
  • Black pepper, to taste
  • About half a package of your favorite frozen french fries, or homemade if you want to get fancy. I used Alexia brand Straight Cut Fries
  • 1/2-a whole block Daiya Cheddar, cut into 1 inch cubes

Directions:

  1. Start by preheating the oven to the temperature the fries are baked at.
  2. Make the no beef and unchick’n broths, allow to cool slightly
  3. Prepare fries according to package…in the meantime prepare the gravy.
  4. Melt the butter or coconut oil in a large saucepan. Add the flour and stir constantly until a roux is formed. This is when it turns into a golden brown color. It takes about 5 minutes.
  5. Add in the garlic and cook for about 30 more seconds.
  6. Stir in the broth with a whisk.
  7. Bring to a boil.
  8. Whisk in the cornstarch and water, stir constantly and let simmer until thickened, about 3-5 minutes…it’s possible you might need slightly more or less cornstarch. I started with 2 tbsp water/cornstarch and then added the extra 1/2 tbsp later when it would not thicken to my liking.
  9. Keep gravy warm (this can be done by turning off the heat and covering, leaving on the stovetop that you cooked it on.
  10. In the last few minutes of cooking the fries, gather them up into the middle of the tray, and randomly drop the Daiya cheddar blocks on top. I’d say only do this for 5 minutes at maximum but do it however you like really.
  11. Take the fries and cheese out, place in a large bowl, and put as much gravy as you like, I probably put close to 4 cups on top. You will have extra gravy that you can use for more poutine or something equally delicious.
  12. Maintenant, nous mangeons! (That’s French for now, we eat!) Enjoy!


Gluten Free and Vegan Boneless Spare-no-ribs

I recently bought four bags of Butler soy curls from Veganessentials.com because they are my favorite gluten free vegan meat substitute. I use this recipe I love for Sweet and Sour Soy Curls, and while I was making it, I realized that soy curls are the perfect shape, size, and texture for trying to replicate Chinese boneless spare ribs. It’s mostly a coincidence that I happen to have perfected the recipe and am posting it on Chinese New Year, although once I realized the coincidence it pushed me to post this faster than I normally would.

IMG_7021

Today starts the year of the Red Monkey according to Chinese astrology. I was born under the year of the rat. When I looked up my Chinese horoscope for the new year for fun, it said I might have a good year, with some luck in career stuff, education, and romance. I hope so!

Gluten Free and Vegan Boneless Spare-no-ribs

Ingredients:

  • 3 cups Butler Soy Curls
  • Enough water to cover dry soy curls in a bowl
  • ¼ cup mirin wine

Marinade:

  • 1 tbsp gluten free hoisin sauce
  • 1 tbsp soy sauce
  • 1 tbsp toasted sesame oil
  • 2 tbsp rice vinegar
  • 2 tbsp ketchup
  • 2 tbsp cherry jam or preserves
  • 1 tbsp brown sugar
  • ½ tsp five spice powder
  • 3 cloves minced garlic
  • 2 tbsp corn starch
  • 1 tsp potato starch
  • 1 tsp egg replacer powder without water added
  • 1/3 cup coconut oil

Sauce:

  • 2 tbsp cherry jam or preserves
  • 1 tbsp agave nectar
  • 1 tbsp molasses
  • ¼ cup rice vinegar
  • ¼ cup gluten free soy sauce, tamari, or liquid aminos
  • 1 tsp minced ginger
  • 2 cloves minced garlic
  • 1 1/2 tbsp cornstarch mixed with 2 tbsp water

Directions:

  1. Reconstitute the soy curls in the liquid for at least 15 minutes.
  2. Drain and squeeze as much liquid out as possible. You can use a clean dish towel to help with this process. Place in a ziplock type bag or bowl.
  3. Prepare the marinade in a food processor or whisk vigorously until smooth.
  4. Pour into the ziplock bag or bowl with the soy curls.
  5. Shake or stir the soy curls so that they are fully coated with the marinade. Allow to marinate overnight or for at least 2 hours.
  6. Before frying the ribs, make the sauce. Stir all ingredients in a small saucepan together and heat over medium heat until warm.
  7. Add in the cornstarch and water and continuously whisk until it thickens and bubbles.
  8. Set aside.
  9. Toss 2 tbsp cornstarch, potato starch, and powdered egg replacer into the bag/bowl and again coat the marinated soy curls.
  10. Heat the coconut oil in a skillet on medium high heat. Allow it to get hot. Place the soy curls into the pan (they should sizzle if the oil is hot enough), and stir until coated and brown. The coconut oil should have fully absorbed. Don’t stir too long or they might start to stick together too much.
  11. Turn the heat to low and stir in the sauce.
  12. Serve and enjoy!

IMG_7019

What the sauce looks like when done.

IMG_7025

Dig in!

I hope you enjoy this recipe! 😀