Vegan MoFo 2017 Day 26: Showstopping dessert pizza

Today’s MoFo daily theme for the weekly theme of entertaining is showstopper dessert.

Well, I certainly have one that will stop me, Fluffy the Vegan Unicorn, from having a movie made about me. Yes, it’s that amazing.

May I present you, a recipe for Dessert Pizza.
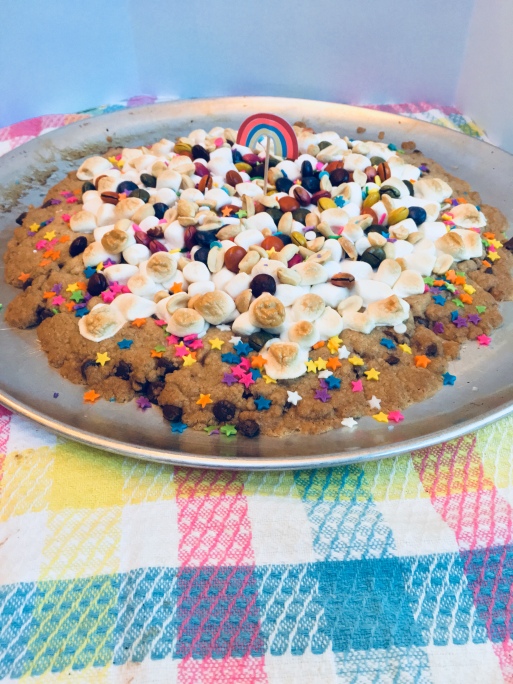
dessert pizza 2

Makes 1 huge cookie enough to serve 12 people

Can be made gluten free

This recipe puts my top two favorite things together: pizza and dessert. Except not in a gross, unappetizing way.

My pal Laura remembers a similar recipe from her childhood: a humongous chocolate chip cookie covered in crispy melted marshmallows and candy. Heavenly!


It makes a great gift for all occasions. You can even put it in a leftover (clean) box from your vegan pizza if you have one to make it even more fun.

This recipe works best with a delicate balance of candy, especially with Unreal vegan chocolate quinoa gems, and sprinkles on top of mini vegan marshmallows (Dandies makes these and you can find them in most grocery stores. If you can only find the big ones, be sure to cut them up into smaller pieces before using them). Be careful not to weigh down the cookie with too many toppings.

This comes out really sweet and rich, which is delightful for unicorns who are known for our sweet teeth! Humans, especially the little ones, may get a tummy ache if they eat too much at once.

Ingredients:

  • 1 tablespoon flaxmeal
  • 3 tablespoons warm water
  • 1/2 cup white vegan sugar
  • 1/2 cup organic brown sugar
  • 2/3 cup melted refined coconut oil
  • 1/2 teaspoon baking soda
  • 1 1/2 cups unbleached all-purpose flour or for a gluten-free version, Bob’s Red Mill All Purpose Flour
  • 6 oz vegan Food Empowerment Project (F.E.P) recommended vegan chocolate chips
  • About ⅔ of a bag of Dandies vegan mini marshmallows
  • Other vegan candy like Unreal’s vegan chocolate quinoa gems, peanuts, chopped up candy bars, etc.
  • Plenty of rainbow sprinkles!

Preheat oven to 375 degrees F. Whisk the flaxmeal with water in a small cup. Let sit and whisk several times until gelled. Voila! Magic vegan cookie binder. Now mix together the sugars, melted coconut oil, and flaxmeal binder. Slowly and carefully stir in the baking soda and flour. Sprinkle the chocolate chips into the batter. Now it’s time to make a giant cookie bigger than the face of a human! On an oiled and large flat baking sheet or pizza pan without holes, place the dough in a ball on top. With your fingers, press the dough into a thin, round, giant cookie the size of a smallish pizza crust. When the crust is formed, place handfuls of marshmallows in the center spreading outwards. Leave about an inch of cookie naked so it looks more like a real pizza with a defined crust. Sprinkle candy, peanuts (optional), and sprinkles on top. Remember not to overload it with toppings, this calls for a delicate balance. Keep it beautiful looking and it won’t be a melty gob of goo. Pop this wonder into the oven and bake for 10-12 minutes. Let cool completely. Using a cookie cutter, slice into pizza shaped portions. Devour or bless someone with an amazing dessert pizza as a gift.


The most perfect gluten free vegan chocolate chip cookies

IMG_1994

I basically honed my baking skills as a kid by making chocolate chip cookies from an alphabet cookbook for kids. It was the only recipe I used, and they always came out perfect. I thought my mom had thrown out the cookbook, but I recently found it and I had to veganize them and make them gluten free. The result was so perfect I was astonished!

Here it is:

Ingredients:

  • 1/2 cup white vegan sugar
  • 1/2 cup organic brown sugar
  • 2/3 cup melted Earth Balance or refined coconut oil
  • 1 tbsp flaxmeal
  • 3 tbsp warm water
  • 1/2 tsp baking soda
  • 1 1/2 cup Bob’s Red Mill All Purpose Flour
  • 6 oz vegan chocolate chips

Directions:

  1. Preheat oven to 375 degrees F.
  2. Whisk flaxmeal with water in a small cup. Let sit and whisk several times until gelled.
  3. Mix together the sugars, melted Earth Balance or coconut oil, and flax egg.
  4. Stir in flour and baking soda.
  5. Add in chocolate chips.
  6. Form dough into small balls and place onto an ungreased cookie sheet. The recipe should make about 24 cookies.
  7. Bake for 10-12 minutes.
  8. Let cool and place on a cooling rack shortly after they come out of the oven.
  9. Enjoy ! I know I will!

IMG_1996


Gluten Free and Vegan Elvis Panini Sandwich!

I have been trying to eat more healthfully lately. In fact, ever since I went gluten free I have found it hard to make up the ridiculously delicious recipes I was used to creating in the past. But today I dreamed up an idea for an amazing unhealthy sandwich that at first I was skeptical of being able to pull off to meet my needs. As I continued to think about it, I devised the methods that could make it healthier, and is the perfect combination of delicious, ridiculous, healthfulness, and satiety level!

This sandwich is a peanut butter and nanner sandwich, with baked vegan rice paper bacun, made with light tapioca gluten free bread, grilled in a panini maker. This definitely is not a very original idea, I’ve seen many a vegan version of this sandwich on blogs and in cookbooks, but this is my version!

It came out so well, that my panini maker has been given a new life outside of sitting in my basement!

Let me walk you through the steps, in picture form. It’s easy!

Bake the rice paper bacun. I did this recipe’s marinade, minus the ground coconut, soaked the rice paper strips in cold water, then in the marinade, and put them on a cookie sheet sprayed with coconut oil. Then I baked them in a 350 degree F oven for about 15 minutes, checking and flipping every 5 minutes (some got done sooner than others, when that happened I took the ones that were done out and put it on a plate while the rest continued to cook)IMG_9197

Set aside.

Take two pieces of Ener-g gluten free light tapioca loaf bread and spray coconut oil on one side of both slices of bread. Put the coconut oil side down on a plate.

IMG_9198

Take out the peanut butter. This is a locally made, all natural, salt and sugar free peanut butter. It’s so good!

IMG_9199

Place one tablespoon of peanut butter on each slice of bread.

IMG_9200

Cut half a banana into slices. Place on one slice.

IMG_9201

Layer the rice paper bacun you made earlier on top of the bananas. Put the peanut butter slice down on top of the bacon to make the sandwich.

IMG_9202

Place the sandwich into a pre-heated panini grill on medium high for about 5 minutes, more or less depending on your device (check on it).

IMG_9203

Ready to go!

IMG_9204

Enjoy!

Asparagus and Saffron and Garlic Aioli

When I was younger, my mom used to make a non vegan version of this that I loved. Every time she’d make it, she would say “Saffron and Garlic Aioliiiiii” all long and drawn out in a funny voice and it made me have fonder memories of it. It leaves you with horrible garlic breath, but is worth it.

IMG_6847

Ingredients:

  • 1 bunch fresh asparagus
  • Olive oil or spray oil
  • 1 cup Just Mayo (vegan mayo brand…I do not recommend trying this with other brands of veganaise, they will get too thin and the taste won’t be the same)
  • 2 cloves garlic, minced
  • 1 tablespoon agave
  • 1/4 cup red wine vinegar
  • 1 pinch saffron threads

Directions:

  1. Preheat oven to 425 degrees F.
  2. Trim the ends of the asparagus off. Place in a baking pan with oil spread or sprayed on the bottom. Spray the tops of the asparagus with oil as well or use a couple teaspoons of oil if you don’t spray.
  3. Bake for 15 minutes.
  4. To prepare the aioli, place the vinegar, agave, and saffron in a saucepan and bring it to a boil on medium heat.
  5. Allow the vinegar to cool in the refrigerator.
  6. Stir the garlic together with the Just Mayo.
  7. When the vinegar mixture is cool, mix together with the mayo and garlic.
  8. Dollop the aioli over the asparagus. Enjoy! It also makes a yummy dip for other veggies and such.

IMG_6845


Italian Rainbow Cookies Veganized

During Christmas, I had this bad habit of being at the grocery store and looking at the ingredients of the Italian Christmas cookies hoping some of them would be vegan. Not a chance. I’ve been craving these all season.

After Christmas, I looked up some recipes for this type of cookie. I wasn’t sure what they would actually be called, but it was easy enough to find. I found this recipe, which I knew I could veganize with the magic vegan ingredient, aquafaba.

I was so worried I’d really mess up making these a lot earlier on. The parts I thought would fail were not as difficult as I thought. The hardest part was cutting it after I put the chocolate on top, which ended up crumbling a bit and making it not as pretty as I would have liked. The recipe makes it sound much more complicated and some of the steps are needlessly complicated, so I’m re-writing the recipe in the way I did it with the vegan substitutions.

This recipe also required making vegan almond paste (with aquafaba as well!)

That is the first step to making these babies.

Vegan Aquafaba Almond Paste

Ingredients:

  • 1.5 cups blanched almonds
  • 1.5 cups vegan powdered sugar
  • 3 tablespoons aquafaba (chickpea water/brine from a can)
  • 1.5 teaspoons almond extract
  • 1/4 teaspoon salt

Directions:

  1. In a food processor, blend the almonds until smooth and pasty.
  2. Add the powdered sugar, aquafaba, extract, and salt.
  3. Process again until smooth and dough-like (it should form into a big ball).
  4. You may need to scrape the sides down frequently throughout the process.
  5. When finished, set aside 3/4 cup for your Italian Rainbow cookies. You can save the leftovers, it’s super yummy!

IMG_6595

Veganized Italian Rainbow Cookies

Ingredients:

  • 2 sticks plus 4 tablespoons Earth Balance sticks
  • 2 cups all purpose flour
  • 1/2 teaspoon salt
  • 3/4 cup almond paste (recipe above)
  • 3/4 cup vegan sugar plus 2 tablespoons
  • 4 tablespoons aquafaba (liquid from a can of chickpeas)
  • 12 tablespoons aquafaba
  • 2 tablespoons vegan sugar
  • food coloring method of choice (red and green)
  • 15 oz Apricot Jam (not the kind with clumpy pieces in it, you want it to be smooth)
  • 10 oz vegan chocolate chips

Directions:

  1. Preheat oven to 350 degrees F.
  2. Place parchment paper on three jelly roll pans or rimmed cookie sheets and spray parchment with cooking oil.
  3. In a stand mixer bowl, place the almond paste and 3/4 cup with 2 tablespoons of sugar. Mix on the medium speed setting until crumbly.
  4. Cut the Earth Balance into small pieces and place into the the mixture while beating together until all the Earth Balance is in there and the batter is smooth.
  5. Sift 2 cups of flour and 1/2 teaspoon salt into a bowl. Add into the mixer slowly and continue to mix until combined. Do not over mix.
  6. In a large metal bowl, using a handheld electric mixer, place the 12 tablespoons of aquafaba. Whip until foamy. Slowly add in the 2 tablespoons of sugar while continuing to whip on the highest setting. Stop when you have created firm peaks (if you take out the whisks from the meringue, and place them upside down, it will not drip down).
  7. Add 1/3 of the meringue into the batter and fold in with a rubber spatula. Add the rest of the meringue and mix until fully incorporated.
  8. Place the batter evenly into 3 bowls. 1 bowl keep plain, and then add green and red to the other two bowls.
  9. Transfer the batters onto their respective cookie sheets one at a time with a wet rubber spatula . My sheets were too big to be able to spread out the batter entirely, so I tried my best to make the most even shaped rectangles on each cookie sheet so they’d match up when layered together after baking.  Don’t worry too much about it, you’ll cut the edges so they’re prettier when it’s all assembled anyhow. Just worry about making relatively even thickness rectangles for now.
  10. Bake for 4 minutes, rotate the pans around in the oven so that one pan is not on the bottom rack the whole time, and bake for another 4-6 minutes until the edges are slightly browned.
  11. Allow to cool completely.
  12. Spread a thin layer of apricot jam on top of the red layer.
  13. Cut any excess parchment paper from around the white layer. Holding the bottom of the cookie with both hands, carefully line up and flip the white layer onto the red.
  14. Spread another layer of jam. Repeat step 13 with the green layer, but do not place anymore jam on top.
  15. Cover with plastic wrap. Place a clean cookie sheet on top to press down the layers. Place something heavy and even (like two cans on either side) on top of that, and place into the refrigerator for at least 4 hours.
  16. Take off the cans, cookie sheet, and plastic wrap. With a sharp knife, trim the uneven sides into a clean rectangle shape. Let sit for a moment or a few.
  17. Melt the chocolate chips in a double boiler or microwave.
  18. Spread over the top layer and sides with a spatula.
  19. Allow to set, and then cut into smalls squares.
  20. Place in a container and store in the refrigerator or at room temperature.

Enjoy! I know I certainly will!


Vegan Mofo Day #20, Post #15: Old family recipe veganized: Nana’s sugar cookies

This recipe can be found in my zine, Childhood Favorites Veganized that you can buy on Etsy and see more recipes I veganized from my childhood and the stories behind them.

According to my mom, this was my great grandmother’s “signature” cookie.

PS: In the zine on the page this recipe is on there is a picture of me with a face covered in chocolate frosting as a child (pictures of me with my food covered face are a common theme in my childhood photo albums). Awhile ago, as part of the zine, I decided to recreate these types of pictures but with a twist–I’m not a kid anymore…

IMG_3087

and because I wanted literal banana curls:

IMG_3083

Doesn’t quite have the same effect as the childhood photos, haha!

On to the cookie recipe:

Ingredients:

  • 1/2 cup non-hydrogenated vegetable shortening
  • 1/2 cup vegan margarine such as Earth Balance
  • 1 cup vegan white sugar
  • 2 cups flour
  • 1 tsp vanilla
  • 1/4 cup almond milk
  • 1 1/2 tsp Ener-g egg replacer, 2 tbsp water whisked together
  • Extra sugar set aside in a shallow bowl for finishing the cookies

Directions:

  1. Preheat oven to 350 degrees F.
  2. Mix ingredients together.
  3. Roll into balls.
  4. Dip a fork in the sugar in the bowl. Press down with the fork onto the ball of dough, making an imprint. Repeat in a criss-cross pattern.
  5. Bake in the oven for 10-12 minutes.

Vegan Mofo Day 4: Post #4: My blog’s 2 year anniversary is today!

bloggiversary

Hey y’all,

Today is my blog’s 2 year anniversary! I made a cute card for the occasion 🙂 It seems like it has been longer than two years, honestly. I’m so proud of how far I’ve come, too. And although I am currently frustrated with being gluten free AND vegan now, I have a feeling this year I will work out some of the problems I’m having with learning to bake vegan AND gluten free. I am going to try to learn through various cookbooks, which is how I learned to cook/bake in the first place. Then once I feel confident enough, hopefully I can go back to creating my own original, unique recipes. I look forward to sharing these adventures with you! This will also hopefully make my blog more accessible to more people!

This is also my second year participating in Vegan MoFo! Woohoo! I’m finding it a little more challenging than last year however, especially as I am finishing my last few bits of work for school before I have my degree!

Today’s theme was to tell everyone about a weird food combination I love. Well, I don’t really have a really weird one, but some people may find this weird: sometimes I get cravings for a peanut butter and potato chip sandwich. I didn’t make one today, because I’m trying to eat a little bit more healthy than usual, and I don’t have that particular craving/am not in that kind of mood…but an especially crispy potato chip (I like Utz’s chips that have ridges in them best for this) can trigger this desire. I like it best with white bread and smooth peanut butter. I think this comes from eating chips with my sandwiches as a kid (I was rarely even allowed to eat chips!) and making sure each bite of my sandwich included a chip at the same time. Eventually, as I became more autonomous in making my own choices about food, I just put the chips directly into the sandwich.

It’s childlike, weird little things like this that can make me happy.

Oh, and here is a picture of some raw brownie cupcakes I made today that I’ll pretend were in celebration for today.

IMG_5092

Vegan MoFo 2015 Day 3, Post #3. Quick and Easy recipe.

Hey everyone!

This quick and easy recipe also happens to follow yesterday’s theme, which is something I grew up with as a kid. The recipe is also in my zine. See yesterday’s post for details about that.

This recipe is simple and can be gluten free if you use gluten free english muffins (I like Ener-g, they remind me of brioches a little bit!) If you don’t like almost raw onions, however, I do not recommend you try this! But if you can tolerate them or like them, I definitely recommend you keep an open mind! It sounds a little weird, but it’s one of my favorite snacks/easy small lunches.

Onion and Green Pepper English Muffin Melts

IMG_5084

Ingredients:

  • 1 medium onion, chopped
  • 1 green onion, chopped
  • 1/2 cup Just Mayo (Veganaise by Hampton Creek)
  • 1/2 cup daiya shredded mozzarella
  • English Muffin (gluten free or regular)

Directions:

  1. Toast English muffin.
  2. Prepare the spread by mixing together all other ingredients in a large bowl.
  3. Spread the mix on each muffin half.
  4. Broil the English muffins until the cheese melts. About 2-5 minutes depending on the oven/toaster. Watch very carefully.
  5. Eat!

Have fun, kids! Happy MoFo! 🙂

Vegan MoFo Post #2: Childhood Favorites: sharing a recipe from my zine!

Hey all,

Welcome again to Vegan MoFo 2015!

Today’s prompt is to recreate a meal from my childhood. I’ve actually already done that multiple times, and wrote about the stories behind them, in my zine that accompanies this blog!

IMG_5077

You can buy it from my Etsy shop here. Please keep in mind, that I wrote these recipes earlier in the year, before I went gluten free, so almost all of the recipes are made with gluten, many are not very easily adaptable either. I can no longer eat most of them either. Such sadness.

But, if you can eat gluten, here is one of a few recipes I will be highlighting from the zine this month!

IMG_5075

Vegan Sausage Macaroni Skillet:

This used to be our favorite meal in our family, until my mom became allergic to milk. For awhile my mom would make it for us on special occasions, or if she couldn’t eat. Since going vegan, I remade it! It came out just as good, and healthier of course. My mom still couldn’t eat it because she can’t have soy. And now I can’t either until I find a good gluten free substitute for the Gimme Lean. Maybe that’s next on my recipe agenda…

Ingredients:

  • 1 package Gimme Lean Sausage style
  • 1 medium onion, chopped
  • 1 green pepper, chopped
  • 1 15 oz can stewed tomatoes
  • 1 tbsp vegan white sugar
  • 1/2 tsp salt
  • 1/4 tsp black pepper
  • 1 cup vegan sour cream (I used Tofutti)
  • 1/4 cup plain almond milk or other non dairy milk of choice
  • 1 cup uncooked elbow macaroni
  • Oil, as needed

Directions:

  1. Break Gimme Lean up into pieces, and fry in a pan with a bit of oil until browned and a bit shiny. It should become firmer than it was before it was cooked.
  2. In a large skillet over high heat, add some oil and saute onions and peppers until they are shiny and start to become translucent. Add the sausage at this point.
  3. Stir in the tomatoes, uncooked macaroni (I promise it’ll be cooked when done), sugar, salt, and pepper.
  4. Remove from heat and stir in the vegan sour cream and almond milk.
  5. Serve and enjoy.

IMG_5079

Have fun!

Making my french toast recipe gluten free!

So when I first went gluten free a few weeks ago I had bought Ian’s brand French Toast Sticks. They were almost inedible. Gross.

So, today I decided to try to re-make my own recipe I had made a long time ago to also be gluten free. It worked better than I thought it would, and was quite tasty, but I can’t say it’s as good as the non-gluten free version. It’ll have to do, though since I feel much better being gluten free.

IMG_4511

To do this, I substituted the flour for gluten free all purpose flour. I used this brand shown here:

IMG_4507

I also recommend adding 1 tbsp maca powder for a more buttery, maple taste that will improve the flavor. If not, maybe try adding at least one more teaspoon of maple syrup.

The bread I used was Ener-g’s brown rice loaf. It had been frozen and defrosted, which I think may have contributed to it’s ability to fry better in the batter because it was a bit stiffer.

Here is a picture of what the batter looks like:

IMG_4505

So, yeah, now I can eat one of my favorite foods as a vegan AND gluten free person! Yay!

🙂