Vegan MoFo 2017 Day 26: Showstopping dessert pizza

Today’s MoFo daily theme for the weekly theme of entertaining is showstopper dessert.

Well, I certainly have one that will stop me, Fluffy the Vegan Unicorn, from having a movie made about me. Yes, it’s that amazing.

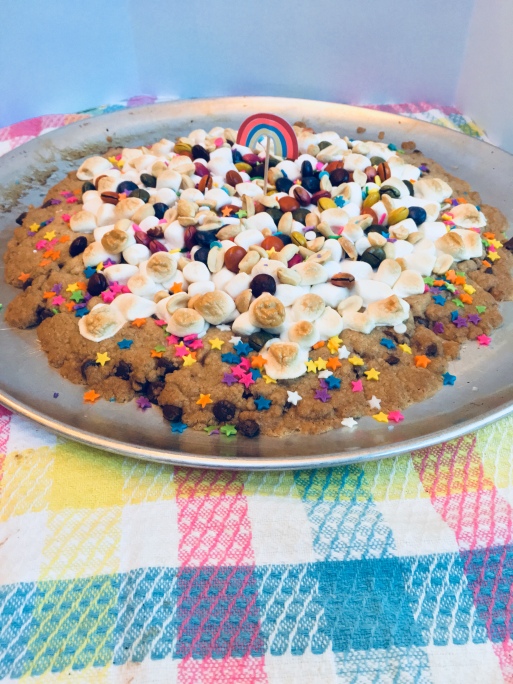
May I present you, a recipe for Dessert Pizza.

dessert pizza 2

Makes 1 huge cookie enough to serve 12 people

Can be made gluten free

This recipe puts my top two favorite things together: pizza and dessert. Except not in a gross, unappetizing way.

My pal Laura remembers a similar recipe from her childhood: a humongous chocolate chip cookie covered in crispy melted marshmallows and candy. Heavenly!


It makes a great gift for all occasions. You can even put it in a leftover (clean) box from your vegan pizza if you have one to make it even more fun.

This recipe works best with a delicate balance of candy, especially with Unreal vegan chocolate quinoa gems, and sprinkles on top of mini vegan marshmallows (Dandies makes these and you can find them in most grocery stores. If you can only find the big ones, be sure to cut them up into smaller pieces before using them). Be careful not to weigh down the cookie with too many toppings.

This comes out really sweet and rich, which is delightful for unicorns who are known for our sweet teeth! Humans, especially the little ones, may get a tummy ache if they eat too much at once.

Ingredients:

  • 1 tablespoon flaxmeal
  • 3 tablespoons warm water
  • 1/2 cup white vegan sugar
  • 1/2 cup organic brown sugar
  • 2/3 cup melted refined coconut oil
  • 1/2 teaspoon baking soda
  • 1 1/2 cups unbleached all-purpose flour or for a gluten-free version, Bob’s Red Mill All Purpose Flour
  • 6 oz vegan Food Empowerment Project (F.E.P) recommended vegan chocolate chips
  • About ⅔ of a bag of Dandies vegan mini marshmallows
  • Other vegan candy like Unreal’s vegan chocolate quinoa gems, peanuts, chopped up candy bars, etc.
  • Plenty of rainbow sprinkles!

Preheat oven to 375 degrees F. Whisk the flaxmeal with water in a small cup. Let sit and whisk several times until gelled. Voila! Magic vegan cookie binder. Now mix together the sugars, melted coconut oil, and flaxmeal binder. Slowly and carefully stir in the baking soda and flour. Sprinkle the chocolate chips into the batter. Now it’s time to make a giant cookie bigger than the face of a human! On an oiled and large flat baking sheet or pizza pan without holes, place the dough in a ball on top. With your fingers, press the dough into a thin, round, giant cookie the size of a smallish pizza crust. When the crust is formed, place handfuls of marshmallows in the center spreading outwards. Leave about an inch of cookie naked so it looks more like a real pizza with a defined crust. Sprinkle candy, peanuts (optional), and sprinkles on top. Remember not to overload it with toppings, this calls for a delicate balance. Keep it beautiful looking and it won’t be a melty gob of goo. Pop this wonder into the oven and bake for 10-12 minutes. Let cool completely. Using a cookie cutter, slice into pizza shaped portions. Devour or bless someone with an amazing dessert pizza as a gift.


Peanut Butter Ice Cream Sundaes!

IMG_4856

In my honest opinion, peanut butter and chocolate is the best combination of flavors in the world. So, I was looking in one of my mom’s cookbooks recently to veganize a Chinese Chicken Salad recipe, and found a recipe for peanut ice cream. It calls for egg yolks (which I veganized with aquafaba) and cream and all kinds of non vegan stuff, so I adapted it quite a bit. It came out quite good. Here’s the recipe:

Peanut butter ice cream sundaes

(Adapted from a non-vegan recipe in the Silver Palate Good Times Cookbook)

Ingredients:

For peanut butter ice cream:

  • 1 can full fat regular coconut milk
  • 1 can Trader Joe’s coconut cream (you can use another can of coconut milk if you don’t have a nearby trader Joe’s, it may not come out as creamy but it will still be good.)
  • 1 15 oz can’s worth of drained chickpea liquid (also referred to as aquafaba)
  • ½ cup vegan sugar
  • 2/3 cup powdered peanut butter
  • 1/3 cup smooth natural peanut butter

For fudge sauce:

  • ¾ stick Earth Balance (6 tbsp)
  • ¼ pound block of dark chocolate, chopped
  • 2/3 cup vegan sugar
  • 1 tbsp instant coffee
  • 1 cup coconut milk from a can
  • ¼ cup unsweetened cocoa powder
  • 1 tsp vanilla

Directions:

For ice cream:

  1. Drain the chickpeas and set aside the liquid. Place in a small saucepan and heat on low until fizzy and reduced to 1/3 cup. Allow to cool for 10 minutes.
  2. Place the chickpea liquid into a ceramic mixing bowl along with the sugar. With an electric mixer, beat for about 5 minutes until peaks form and ribbons fall off the beaters.
  3. Pour the coconut milk and coconut cream into a large saucepan. Whisk a bit by hand until the clumps come out of the coconut cream and it is smooth. Heat on the stove until hot but not boiling.
  4. Take off the heat and add in the chickpea liquid/sugar mixture and whisk by hand until combined.
  5. Place on heat, stirring constantly with a wooden spoon. It is ready to go when the liquid coats the back of the spoon.
  6. Allow to cool for at least a half hour off the heat. Add in the peanut butter and peanut butter powder and transfer to a blender. Blend until combined.
  7. Place in a container and refrigerate overnight.
  8. Follow your ice creamer maker directions and then stick in the freezer after it’s ready for at least another hour before serving.

For fudge sauce:

  1. Melt the Earth Balance in a medium sized saucepan.
  2. Shut off the heat once melted, and add all ingredients except vanilla.
  3. Heat over medium heat until boiling while stirring constantly.
  4. When boiling, turn to low and stir for an additional 5-10 minutes until smooth and thick.
  5. Take the pan off the heat and add in the vanilla extract.
  6. Allow to cool briefly and serve while still warm on top of ice cream. You will need to refrigerate and reheat (try steaming with a double boiler) when using again.
What the chickpea liquid and sugar should look like before you add it to the coconut

What the chickpea liquid and sugar should look like before you add it to the coconut

The ice cream when done

The ice cream when done

The chocolate sauce when done

The chocolate sauce when done

Top your ice cream and fudge with peanuts and coconut whipped cream (that is if you can master it! I haven’t been able to for some reason…go figure).

Making vegan Macarons for the first time!

IMG_4640

French macarons (not to be confused with coconut macaroons) are a meringue based sandwich cookie with almond flour. They are quite popular and come in all different kinds of flavor combinations. They are supposedly difficult to make even when not vegan. Vegan macarons were once believed to be impossible to make, because there was no good vegan alternative to meringues. But now there is!

You may recall my post about magical bean juice (also referred to as aquafaba in vegan circles) for making meringue cookies. You can do the same thing with these! I didn’t make up my own recipe since I’ve never made these before, but I still want to share the recipe I used and my results.

This is the recipe I used but I changed the flavors, colors, and frosting recipe. It worked perfectly for me, even on my first try. I personally feel like it it might have had a lot to do with the weather, it was a great sunny day. I found this recipe from a group all all about making vegan meringue and using aquafaba.

I chose to make lavender agave frosting and used a super fruit jelly in the middle from Trader Joe’s.

IMG_3930

The texture came out so great. The frosting I made was a little runny, so the recipe I am including here is changed to account for it to be better.

IMG_4638

The recipe for the frosting is as follows:

  • 1 tbsp agave
  • 2 cups powdered sugar
  • 1/2 tsp lavender extract
  • 3 tbsp almond milk

You just need to mix everything together.

IMG_3932

in the oven almost done

IMG_3937

out of the oven

IMG_3935

close up of the feet

I absolutely loved these, and the best part is they are automatically gluten free!

I’m deep in the midst of making food for volunteers at Girls Rock RI this week, stay tuned for a post about that soon!

Magic Bean juice for lavender vegan meringues

Okay, so I had been aware that vegans all over the internet had discovered that it was possible to make meringue out of the juice inside a can of chickpeas (drained from the chickpeas). However, I was a bit skeptical. I didn’t think it was easy. But I finally got the courage to try. It was a beautiful day out, and though I’m not sure it’s the same for vegan meringue, I remember as a kid when my mom would make my grandmother’s famous real meringues, they wouldn’t come out well if it was rainy or humid. Apparently that’s an actual thing. So, thinking to myself that it was the perfect day, I decided to make them.

Meringue was seriously one thing I never thought would be successfully veganized, but I was so wrong. To me, this just proves “anything you can eat I can eat vegan!” It’s like the last frontier of veganizing…

So behold! the magical vegan bean juice. I can’t wait to try to veganize my mom’s meringue frosting, macarons, and more, never mind explore other flavors for these ones. I think I will try some peppermint chocolate chip ones next…

I took a bit of artistic license to this recipe. That recipe uses white beans instead of chickpeas and doesn’t have a flavor. I personally cannot taste the chickpeas in the recipe I created, but it’s probably because I added stuff to it.

IMG_3817

Ingredients:

  • The strained juice of a 15 oz can of chickpeas minus one tablespoon. 
  • 1/4 cup plus 2 tbsp vegan sugar
  • 1/2 tsp lemonade (I used organic bottled strawberry lemonade)
  • 1 tbsp blueberry juice (I took the juice of some frozen blueberries that I microwaved for a bit)–this doesn’t add flavor, it’s just for the effect of the color, so this is essentially optional
  • 2 drops vanilla extract
  • 1/8 tsp lavender extract

Directions:

  1. Preheat oven to 200 degrees F.
  2. In a large mixing bowl, pour the bean juice, sugar, lemonade, and blueberry juice.
  3. With an electric handheld mixer or whisk attachment on a stand mixer, begin to whisk together the ingredients in circles around the sides of the mixing bowl.
  4. Continue to mix until thick and fluffy. The time varies a lot. It took mine 10 minutes to get to the perfect point, but I had my handheld mixer on the highest setting (5) and I’m not sure how other brand mixers may work. See picture for reference.
  5. When thick yet fluffy with peaks, add in the extracts and give it about 2 minutes of remixing again.
  6. Lay some parchment paper on several baking sheets. Take a spoon and add dollops of the meringue onto the sheet, like cookies only with a more liquid batter. They will come out looking prettiest if you try to make them look like chocolate kisses. You know what I mean I hope…I can’t describe it any other way, haha.
  7. Place in the oven for an hour. After an hour, check them. The baking sheet that was on the bottom rack was done at this point. If you poke them with your finger they should be stiff and not make a print.
  8. It took about an hour and 15 minutes for the rest of my meringues to be done. If they’re not done after an hour and 15, check in another ten minutes, and then more frequently after that if they’re still not ready.
  9. Allow to cool on the sheets for at least 15 minutes. You’ll want to eat them, and you can enjoy almost as many as you want, I calculated that they are only about 10 calories each…depending on how big you make them (I made 34).
  10. Store them (if you have any left) in a sealed container to try to prevent them from getting too moist. I personally like them a bit soggier and chewy, though!
what it should look like when ready

what it should look like when ready

before going into the oven

before going into the ovenIMG_3815

Meringues were big in my family growing up, as I mentioned above. Check out more childhood favorite recipes that I veganized in my zine, on etsy! 

Last day of Vegan Mofo 2014, I’m sad! Here are some too-good baked goods-Chamomile Lavender Cupcakes

Ugh, I’m so sad Vegan MoFo is over. This was a great month for me and my blog. I was worried I wouldn’t be able to pull it off, as I started a new college program at the same time. I did it though! And my blog got featured on the Vegan MoFo Roundup, mid way through. I had met all the success markers I had set for myself in participating in this, including over 500 views. I actually doubled that amount! This was my most successful month of blogging to date, which is not surprising as MoFo provides a lot of the ability to be successful by participating in it. The trick is to a stress-free MoFo while being quite busy, I found, is to plan it out early. I made a calendar of recipes in advance, tested them, photographed them and did not stray too much from that!

I met and interacted with a lot of great bloggers that I haven’t been able to before, which was really nice. I have a bunch of new vegan blogs to follow now full of awesome people!

I have a lot of exciting things planned in the coming month as well, so don’t stop checking out my blog! Tonight I am going to be testing out a recipe for spinach raviolis with butternut squash and sage filling which I hope to post soon. I may even be doing a cooking demo for them in RI. October is my Birthday month, and I have a birthday cake waffle recipe I’ll be sharing soon! There will be other posts too that relate to my vegan education project for new vegans or people interested in becoming vegan, in which I’ll be addressing common concerns and how to deal with them. If you have any suggestions for things you’d like to see me cover, be sure to comment here or in the future.

Now, without further ado, let’s get the final Vegan MoFo recipe for Chamomile Lavender Cupcakes out!

photo (6)

Makes a dozen regular sized cupcakes.

Ingredients:

For the cupcakes:

  • 3/4 cup vegan sugar
  • 1 tea bag worth of chamomile tea opened up, contents removed
  • 1 tbsp dried culinary lavender
  • 1/3 cup coconut oil, melted not solid
  • 1 cup unflavored (plain) almond milk
  • 1 cup unbleached all purpose flour
  • 1/2 tsp baking soda
  • 1/2 tsp baking powder
  • 1/2 tsp vanilla extract

For the icing:

  • 1 tbsp melted coconut oil
  • 1/2 cup organic powdered sugar
  • 1 tbsp and a few drops coconut creamer
  • a couple drops of lavender extract (optional)
  • vegan red and blue food coloring to make a lavender hue (optional)

Decoration (optional):

  • Dried Chamomile flowers

Directions for the cupcakes:

  1. Preheat oven to 350 degrees F. Line a cupcake tin with twelve cupcake liners.
  2. In a food processor, blend the sugar, chamomile tea and lavender until ground well and very fragrant. Be careful upon opening the food processor, as there will be powder coming out…don’t inhale!
  3. Melt the coconut oil.
  4. Whisk the sugar and herb mix, almond milk, and coconut oil in a medium large size mixing bowl.
  5. Mix in the baking soda and powder.
  6. Incorporate the flour in.
  7. Add vanilla extract and stir until everything is mostly smooth. The batter will be a bit clumpy with the coconut oil and that’s okay.
  8. Place about 2 tbsp of the batter in each muffin tin.
  9. Bake for about 15-20 minutes or until a toothpick comes out clean when inserted in the middle of the cupcake.
  10. Wait 5 minutes and then place on cooling racks. Allow to cool completely before decorating with the icing.

Directions for the icing:

  1. With a small whisk, mix up the coconut oil and powdered sugar in a small bowl until large crumbs form.
  2. Add the coconut creamer and whisk until smooth.
  3. Add the optional extract and food coloring and mix until satisfied.

For assembly:

  1. Use a frosting spatula and place a thin layer of the icing on each cupcake.
  2. Decorate with dried chamomile flowers.

850X315_g3_fb-1

Bye, Vegan Month of Food 2014! See you next year in 2015! I already cannot wait!

Vegan MoFo 2014: Too Good Baked Good Tuesday: Pina Colada Pie

Phew, I am barely making it to post this tonight. I literally just finished it, as it requires 3 hours of chill time.

This recipe was originally inspired by a recipe for lemon pie in the book Soy Not “Oi!”, but I ended up changing it quite a bit once I realized it was going to taste better and be a better consistency the way I wanted to. It’s still somewhat runny, but is incredibly delicious, if I may say myself (I just tasted it!) I am bringing the rest (I made 2!) to school tomorrow so they can all try it and give me feedback on it, as well.

photo 1 (1)

Pina Colada Pie

Makes 1 pie

Ingredients:

Pie crust:

  • 1/2 cup whole wheat pastry flour
  • 1/2 cup unbleached white flour
  • 1/2 tsp vegan sugar
  • 3 tbsp cold Earth Balance
  • 3 tbsp non-hydrogenated organic vegetable shortening
  • 2 tbsp cup cold water

Pie filling:

  • 1 1/2 cups sugar
  • 2 tbsp cup cornstarch
  • 1 cup coconut milk
  • 1/2 cup pineapple juice
  • 3 teaspoons arrowroot
  • 3 tsp water
  • 2 tbsp Earth Balance 
  • 1/2 cups boiling water
  • 1/2 tsp agar agar powder

Whipped cream:

  • 1 can coconut milk (I used Goya brand), placed in the freezer for at least an 1 hour before use with the white cream scooped out only, not the rest of the clear liquid.
  • 1 1/2 cup vegan powdered sugar
  • 1/2 cup organic non-hydrogenated vegetable shortening
  • 1/4 tsp vanilla

To make the pie Crust:

  1. Place flours and sugar in a food processor. Give it a quick whir to combine together.
  2. Add 1 tbsp of shortening, quickly pulse, and continue to add the shortening 1 tbsp at a time until you’ve put in 3 tbsp.
  3. Follow the same method with the earth balance as above.
  4. With the processor running, open the little opening thing on top and slowly pour in the water.
  5. Smoosh into a round disk shape, and wrap in plastic wrap.
  6. Refrigerate for at least 15 minutes to 2 hours.
  7. Preheat oven to 400 degrees F.
  8. Roll out the dough into a thin round layer on top of plastic wrap.
  9. Carefully place on top of a pie pan and shape the crust with your fingers around the edges of the pan.
  10. Bake in the oven 7-12 minutes until golden and crispy looking and not mushy when touched.

To make the pie filling:

  1. In a saucepan, add sugar and cornstarch.
  2. Stir in the coconut milk and pineapple juice.
  3. In a separate cup, whisk the arrowroot and water together. Add to the other ingredients in the saucepan.
  4. Add the margarine and boiling water over the Earth Balance so it melts.
  5. Heat on medium heat on the stove until just starting to thicken, stirring frequently with a wooden spoon.
  6. Once starting to thicken, add in the agar agar powder and immediately start to whisk until combined. Be careful to whisk a.s.a.p after placing it in the saucepan and whisking all around the pan or you may end up with agar agar clumps throughout. It will thicken very quickly after this step.
  7. Shut off the heat and continue to whisk for a bit.
  8. Pour into the pie shell you made and refrigerate for 3 hours before piping the whipped cream on top.

To make the whipped cream:

  1. Place the coconut milk can in the freezer for at least 1 hour before using.
  2. Open the can and scoop out the solid cream with a spoon. Use the remainder of the watery coconut milk in a smoothie or whatever else you think you’d like it in.
  3. Add in the powdered sugar, shortening, and vanilla. Mix with a rubber spatula until combined.
  4. Use a handheld electric mixer and whisk in circles until peaks form.
  5. Place in the refrigerator until ready to use/place on top of the pie, or for at least an hour until it’s more solid. I like to place it in a ziploc bag and cut the tip and squirt it out in little round globs.
  6. You will have extra left depending on how you choose to decorate the pie, so use every last bit of that for other delicious reasons!

photo 2 (2)

Oh, and here’s an interesting wikipedia article on the history and other fun facts about one of the ingredients I used, agar agar.

See you tomorrow for another entry for Vegan MoFo 2014!

850X315_g3_fb-1

My own vegan brownie recipe!

Image

i have been very picky with vegan brownie recipes. Honestly, I haven’t found a good enough recipe and I’ve tried a lot. So, I decided to take the plunge and create my own. I really had no idea how it would turn out and got so nervous…I decided to try making plain brownies before I try to make them fancier for a secret recipe I’m currently working on for an Earth Balance baking contest. I decided once I made these that they’ll do the trick for that purpose, and wanted to share the recipe now for just the brownies, because I think they did come out pretty good for vegan brownies. My mom has a family recipe she uses that aren’t vegan, and I looked at that to get some ideas, but her recipe has way too many eggs to be able to veganize, as well as way too much margarine for my liking.

So here is the recipe:

Ingredients:

  • 1 1/2 cup unbleached all purpose flour
  • 1/2 cup unsweetened cocoa powder
  • 1/2 cup vegan white sugar
  • 1/2 cup brown sugar
  • 1/2 tsp baking powder
  • 2 tbsp flaxmeal
  • 6 tbsp water
  • 1 stick (8 tbsp, or 1/2 cup equivalent) earth balance margarine, melted
  • 1/3 cup applesauce
  • 1 tsp vanilla extract
  • 3/4 cup non-dairy milk

Directions:

  1. Preheat oven to 350 degrees Fahrenheit.
  2. Mix dry ingredients (except flaxmeal) in a bowl together.
  3. Make 2 flaxmeal “eggs” by whisking the 2 tbsp flaxmeal and 6 tbsp water together. Let sit until thick.
  4. Mix flaxmeal “eggs” and the rest of the wet ingredients into the dry. It should have a runny yet thick consistency.
  5. Place in a baking dish sprayed with oil.
  6. Bake brownies for 20-30 minutes. I recommend after 20 minutes starting to check with a toothpick inserted into the middle until it comes out clear every five minutes and adjusting the time if it seems it will be done in less than 5. I find that ovens can vary drastically from oven to oven, so I want to make sure it works for you and say this! 🙂
  7. Take out of the oven when done. Let sit until cooled most of the way or fully, and slice, and enjoy!

Foodie (Photo) Friday, Thanksgiving Edition!

I’m still kind of super tired, I guess my cold is not totally gone and it’s upsetting to me a bit.

So I apologize, but I’m going to try to get through posting this fairly quickly so I can go to bed early, haha.

Image

This was one of my better Vegan Thanksgivings though. I ended up making a Tofurky roast feast in the crockpot with this recipe. I also cooked up the gravy that came with it. My grandmother brought some jarred pearl onions and we cooked them with some pepper, paprika and earth balance. I don’t know why, but I always liked that, it’s simple and really good. Probably the most elaborate thing I made, besides the pumpkin pie I ended up making, was the green bean casserole. It was well worth it though, it was quite tasty. Actually, I had been worried about it because I thought it might taste too parsnip-y, but it balanced really well. I only put 1/2 tsp salt in it total, though, and it was fine. The recipe calls for 1 1/2 tsp! No way. I’ll definitely be making it next year, though (well, if I decide to make a green bean casserole…and other factors…heh).

Image

Additionally, I made potato latkes for Thanksgivukkah. I also made Baba Ganoush for an appetizer. I don’t think I can link the recipe to it though, I found the recipe that I had printed out awhile ago and have no idea where I got it from now. But it’s quite tasty. You roast 2 eggplants with some garlic (you put the garlic on it halfway through cooking the eggplants). Then you use the roasted garlic, sesame seeds, sunflower seeds, olive oil, salt, etc and make a paste in a food processor, then add the eggplant and combine.

Image

I know I had said I was making pumpkin pie graham cracker squares for dessert, but I ended up getting the Eat To Live Cookbook I had ordered and they had a fantastic sounding pumpkin pie that I decided to make instead. So I did. It’s sugar and flour free, which is awesome. It’s sweetened with dates instead. Aside from the fact that the crust is made from almonds, I couldn’t tell any other aspect was done differently than the traditional recipe. It was soooo good and I liked the cashew cream to put on top but I should have made a little less since I ended up giving a lot of the pie away without it so that I wouldn’t end up eating the whole thing myself (my family is not big on pumpkin desserts for some reason, but I am…)

My meals leading up to Thanksgiving basically just consisted of two things:

Image

Pumpkin Echiladas from the Vegan Stoner Cookbook, and Green Bean Casserole Pizza from Bake and Destroy.

Image

Image

I hope you all had a very Happy Thanksgiving, or Thanksgivukkah (Hanukkah…although it’s still happening…) if that’s your thing too. I was very glad to have a cruelty free and vegan Thanksgiving for myself once again, so I’m going to leave you this picture of me in my majestic Compassion Company Thanskgiving t-shirt.

Image

My “Thanksgivukkah” Menu- a bit early but at least I’m prepared!

So this year, Hanukkah and Thanksgiving happen to occur at the same time. Hanukkah starts at sundown on Wednesday the 27th, and since it goes on for 8 nights, Thanksgiving will co-occur. My family doesn’t really celebrate Hanukkah as much as we used to (I think my dad, who is Jewish but not really religious married my mom so he could celebrate Christmas at times, hehe, although we don’t really celebrate Christmas that much either…)

Anyways, my family has some traditions around holiday time that are difficult to break, despite being a vegan and/or not really being into the actual holidays themselves. One is that we try to have Potato latkes the first night of Hanukkah. But since everyone ends up eating a lot on Thanksgiving, and we’ll be doing tons of cooking on the first night in preparation for Thanksgiving, it kind of makes more sense to have potato latkes with Thanksgiving food. Someone on my facebook called it Thanksgivukkah, and I thought that was funny, so I decided to call this post that.

I end up making a lot of separate foods that I make for myself and feast off of for the rest of the week, since my family is not vegan along with me sadly. So for the past three years I have been making my own Thanksigiving menu that people can eat from if they want to, or not.

This year I am making:

Baked Potato Latkes from the Happy Herbivore Blog

A healthy green bean casserole (I may need to put some vegan fried onions on top too, we’ll see…)

Tofurky  (I think I am getting a coupon from purchasing a limited edition thanksgiving shirt from Compassion Co., so I really want to do this this year!)

and for dessert:

*edit* I was going to make some pumpkin pie squares but ended up choosing to make the Eat To Live Cookbook’s pumpkin pie because it seemed like a healthier choice–Eat To Live Cookbook is my newest (and healthiest) cookbook I own.

Look out for my reviews of these recipes, hopefully on Thanksgiving day or the day after! Let me know if you decide to make any of these as well, and then let me know what you thought!