Vegan MoFo 2017 Day 19: Minimalist White Chocolate Fudge

Today’s theme is Minimalist (5 ingredients or less!) vegan recipes. May I present vegan white chocolate fudge fit for a unicorn! This stuff is really good, and it’s almost as hard to find vegan white chocolate as it is to find a unicorn, so it seems fitting. I usually get culinary cocoa butter online, but I believe places such as Whole Foods sell it in the nutritional supplement/superfoods section. Just be sure you’re buying food grade and not cosmetic grade as I believe there is a big difference between the two! 

unicorn fudge 2 of 2

Here is the recipe:

Ingredients:

  • 3 cups cocoa butter (I used a brand that was recommended by Food Empowerment Project)
  • 1 can sweetened condensed coconut milk
  • 2 cups organic powdered sugar
  • 1 tsp vanilla extract
  • Toppings of choice such as Dandies Mini Marshmallows, a variety of freeze dried fruit slices, crushed up cookies or candy, sprinkles, etc. I used Sweet and Sara’s rainbow cereal marshmallows I got before they announced their closure.

Directions:

  1. Melt the cocoa butter and condensed coconut milk until all the cocoa butter bits are liquified. It will become a bit of a golden brown liquid, that’s okay.
  2. Slowly stir in one-half cup of the powdered sugar at a time until smooth and no longer clumpy. Unicorns don’t like clumps.
  3. Grease an 8×8” pan and spray the bottom and sides with a nonstick spray. You may also want to line it with parchment paper to make it easier to remove from the pan later.
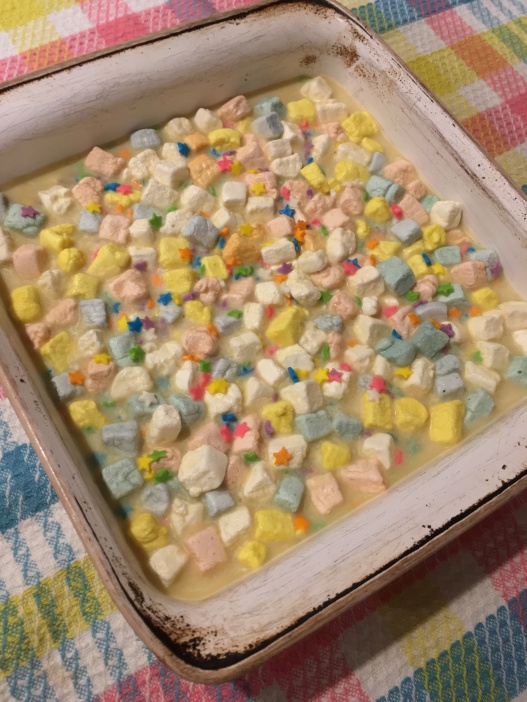
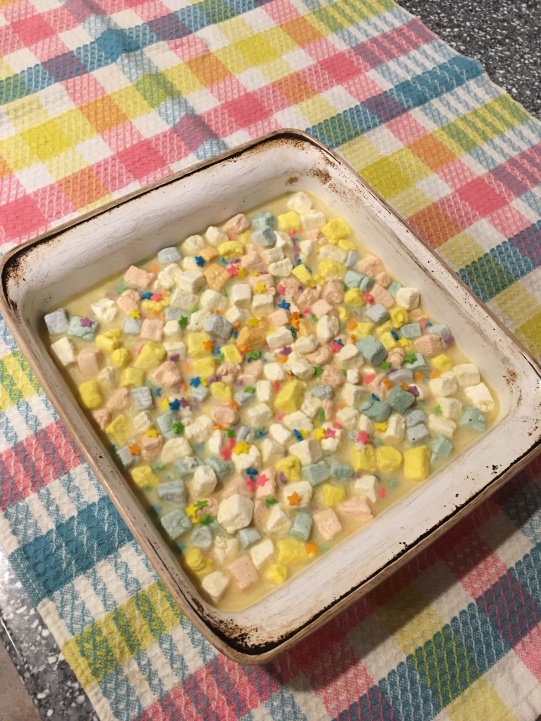
  4. Pour the liquid fudge into the pan. Spread the toppings across the shiny surface. They should float to the top like a mermaid who has come to the surface of the ocean.
  5. Make sure the top is pleasing to the eye, cover, and place into the fridge for at least 2 hours or overnight until set.
  6. Slice into cubes and serve.
  7. Store in the fridge in an airtight container for up to two weeks.

unicorn fudge 1 of 2

Cake Batter Everything

IMG_7573

Thanks to this recipe for cake batter butter, I discovered that vegan butter extract exists, and started going a little overboard making all things cake batter.

Then I decided to make a raspberry cake batter smoothie.

IMG_7523

It’s basically two cups nondairy milk, a scoop of vanilla protein powder (I use Vega Essentials), 1/3 cup frozen raspberries, one banana, 1/2 tsp vegan butter extract, 1/2 tsp almond extract, and 2 tsp vanilla extract. I also added in some vegan sprinkles, So Delicious coco whip to make it creamier (about 1/3 cup in the smoothie, and more for the topping), and drank it out of a fun straw. If you make the nut butter, you can also add a tablespoon or two into the blender.

Enjoy!

PS: If you like vegan, gluten free, soy free, and protein packed waffles, check out the new Fitquick birthday cake flavor…I haven’t tried it yet but I love their stuff and can’t wait until I can!


Magic Bean juice for lavender vegan meringues

Okay, so I had been aware that vegans all over the internet had discovered that it was possible to make meringue out of the juice inside a can of chickpeas (drained from the chickpeas). However, I was a bit skeptical. I didn’t think it was easy. But I finally got the courage to try. It was a beautiful day out, and though I’m not sure it’s the same for vegan meringue, I remember as a kid when my mom would make my grandmother’s famous real meringues, they wouldn’t come out well if it was rainy or humid. Apparently that’s an actual thing. So, thinking to myself that it was the perfect day, I decided to make them.

Meringue was seriously one thing I never thought would be successfully veganized, but I was so wrong. To me, this just proves “anything you can eat I can eat vegan!” It’s like the last frontier of veganizing…

So behold! the magical vegan bean juice. I can’t wait to try to veganize my mom’s meringue frosting, macarons, and more, never mind explore other flavors for these ones. I think I will try some peppermint chocolate chip ones next…

I took a bit of artistic license to this recipe. That recipe uses white beans instead of chickpeas and doesn’t have a flavor. I personally cannot taste the chickpeas in the recipe I created, but it’s probably because I added stuff to it.

IMG_3817

Ingredients:

  • The strained juice of a 15 oz can of chickpeas minus one tablespoon. 
  • 1/4 cup plus 2 tbsp vegan sugar
  • 1/2 tsp lemonade (I used organic bottled strawberry lemonade)
  • 1 tbsp blueberry juice (I took the juice of some frozen blueberries that I microwaved for a bit)–this doesn’t add flavor, it’s just for the effect of the color, so this is essentially optional
  • 2 drops vanilla extract
  • 1/8 tsp lavender extract

Directions:

  1. Preheat oven to 200 degrees F.
  2. In a large mixing bowl, pour the bean juice, sugar, lemonade, and blueberry juice.
  3. With an electric handheld mixer or whisk attachment on a stand mixer, begin to whisk together the ingredients in circles around the sides of the mixing bowl.
  4. Continue to mix until thick and fluffy. The time varies a lot. It took mine 10 minutes to get to the perfect point, but I had my handheld mixer on the highest setting (5) and I’m not sure how other brand mixers may work. See picture for reference.
  5. When thick yet fluffy with peaks, add in the extracts and give it about 2 minutes of remixing again.
  6. Lay some parchment paper on several baking sheets. Take a spoon and add dollops of the meringue onto the sheet, like cookies only with a more liquid batter. They will come out looking prettiest if you try to make them look like chocolate kisses. You know what I mean I hope…I can’t describe it any other way, haha.
  7. Place in the oven for an hour. After an hour, check them. The baking sheet that was on the bottom rack was done at this point. If you poke them with your finger they should be stiff and not make a print.
  8. It took about an hour and 15 minutes for the rest of my meringues to be done. If they’re not done after an hour and 15, check in another ten minutes, and then more frequently after that if they’re still not ready.
  9. Allow to cool on the sheets for at least 15 minutes. You’ll want to eat them, and you can enjoy almost as many as you want, I calculated that they are only about 10 calories each…depending on how big you make them (I made 34).
  10. Store them (if you have any left) in a sealed container to try to prevent them from getting too moist. I personally like them a bit soggier and chewy, though!
what it should look like when ready

what it should look like when ready

before going into the oven

before going into the ovenIMG_3815

Meringues were big in my family growing up, as I mentioned above. Check out more childhood favorite recipes that I veganized in my zine, on etsy! 

Vegan MoFo Day 25: Easy Green Tea Smoothie and Latte Recipes for a Busy Day

Today I’m headed into Boston for a research study. I woke up earlier than I’d like to admit, fit in a run that ended up being pretty crappy, and now I’m trying to rush to get other stuff done before I have to leave for the train. However, I get to also go to Veggie Galaxy with a friend tonight!

Back in my pre-vegan days, there was this Asian Market I loved exploring when I lived in Boston. I once bought a huge green tea latte milk tea mix that tasted slightly like melon, it was amazing.

To try and recreate that taste, I have made this green tea smoothie (I wish it looked more green!).

IMG_2362

It’s pretty simple actually.

1 1/2 cups almond coconut milk

1 cup watermelon (I froze a bunch of it in cup-sized portions this Summer to use later in the year)

1 banana

Vanilla Protein Powder

1 tbsp green tea powder (matcha)

You just blend these ingredients together to make the smoothie.

I also have really been enjoying an even simpler recipe for a hot green tea latte.

You simmer 1 cup almond coconut milk and 1 tbsp green tea (matcha powder) until boiling, and then I like to add some liquid stevia extract in to that. Mmm. And great because I refuse to drink coffee but haven’t given up caffeine entirely.

850X315_g3_fb-1

Vegan MoFo 2014: Too Good Baked Good Tuesday: Pina Colada Pie

Phew, I am barely making it to post this tonight. I literally just finished it, as it requires 3 hours of chill time.

This recipe was originally inspired by a recipe for lemon pie in the book Soy Not “Oi!”, but I ended up changing it quite a bit once I realized it was going to taste better and be a better consistency the way I wanted to. It’s still somewhat runny, but is incredibly delicious, if I may say myself (I just tasted it!) I am bringing the rest (I made 2!) to school tomorrow so they can all try it and give me feedback on it, as well.

photo 1 (1)

Pina Colada Pie

Makes 1 pie

Ingredients:

Pie crust:

  • 1/2 cup whole wheat pastry flour
  • 1/2 cup unbleached white flour
  • 1/2 tsp vegan sugar
  • 3 tbsp cold Earth Balance
  • 3 tbsp non-hydrogenated organic vegetable shortening
  • 2 tbsp cup cold water

Pie filling:

  • 1 1/2 cups sugar
  • 2 tbsp cup cornstarch
  • 1 cup coconut milk
  • 1/2 cup pineapple juice
  • 3 teaspoons arrowroot
  • 3 tsp water
  • 2 tbsp Earth Balance 
  • 1/2 cups boiling water
  • 1/2 tsp agar agar powder

Whipped cream:

  • 1 can coconut milk (I used Goya brand), placed in the freezer for at least an 1 hour before use with the white cream scooped out only, not the rest of the clear liquid.
  • 1 1/2 cup vegan powdered sugar
  • 1/2 cup organic non-hydrogenated vegetable shortening
  • 1/4 tsp vanilla

To make the pie Crust:

  1. Place flours and sugar in a food processor. Give it a quick whir to combine together.
  2. Add 1 tbsp of shortening, quickly pulse, and continue to add the shortening 1 tbsp at a time until you’ve put in 3 tbsp.
  3. Follow the same method with the earth balance as above.
  4. With the processor running, open the little opening thing on top and slowly pour in the water.
  5. Smoosh into a round disk shape, and wrap in plastic wrap.
  6. Refrigerate for at least 15 minutes to 2 hours.
  7. Preheat oven to 400 degrees F.
  8. Roll out the dough into a thin round layer on top of plastic wrap.
  9. Carefully place on top of a pie pan and shape the crust with your fingers around the edges of the pan.
  10. Bake in the oven 7-12 minutes until golden and crispy looking and not mushy when touched.

To make the pie filling:

  1. In a saucepan, add sugar and cornstarch.
  2. Stir in the coconut milk and pineapple juice.
  3. In a separate cup, whisk the arrowroot and water together. Add to the other ingredients in the saucepan.
  4. Add the margarine and boiling water over the Earth Balance so it melts.
  5. Heat on medium heat on the stove until just starting to thicken, stirring frequently with a wooden spoon.
  6. Once starting to thicken, add in the agar agar powder and immediately start to whisk until combined. Be careful to whisk a.s.a.p after placing it in the saucepan and whisking all around the pan or you may end up with agar agar clumps throughout. It will thicken very quickly after this step.
  7. Shut off the heat and continue to whisk for a bit.
  8. Pour into the pie shell you made and refrigerate for 3 hours before piping the whipped cream on top.

To make the whipped cream:

  1. Place the coconut milk can in the freezer for at least 1 hour before using.
  2. Open the can and scoop out the solid cream with a spoon. Use the remainder of the watery coconut milk in a smoothie or whatever else you think you’d like it in.
  3. Add in the powdered sugar, shortening, and vanilla. Mix with a rubber spatula until combined.
  4. Use a handheld electric mixer and whisk in circles until peaks form.
  5. Place in the refrigerator until ready to use/place on top of the pie, or for at least an hour until it’s more solid. I like to place it in a ziploc bag and cut the tip and squirt it out in little round globs.
  6. You will have extra left depending on how you choose to decorate the pie, so use every last bit of that for other delicious reasons!

photo 2 (2)

Oh, and here’s an interesting wikipedia article on the history and other fun facts about one of the ingredients I used, agar agar.

See you tomorrow for another entry for Vegan MoFo 2014!

850X315_g3_fb-1

Vegan peanut butter and fluff craving? No problem

I have been craving a peanut butter and fluff sandwich for awhile, and finally tonight was the tipping point. But, the store near me that carried a vegan fluff alternative stopped carrying it, and I never liked the taste and texture of that product anyhow. 

There’s a recipe in Betty Goes Vegan, but the description explained how difficult it was to get right, and I also didn’t have much time to make it, I wanted it right away.

So I created my own with a little idea. It took less than five minutes. I kind of whipped everything together without thinking about it, so the proportions may be off a bit in this recipe.

10615472_10100188311090389_3773528224453027939_n


Ingredients:

1/2 cup brown rice syrup

1 cup powdered sugar

1 tsp vanilla extract

2 tbsp vanilla almond milk

Directions:

  1. Stir all ingredients with a spoon in a bowl.
  2. If needed, add more powdered sugar or rice syrup to make a consistency to your liking. 


My own vegan brownie recipe!

Image

i have been very picky with vegan brownie recipes. Honestly, I haven’t found a good enough recipe and I’ve tried a lot. So, I decided to take the plunge and create my own. I really had no idea how it would turn out and got so nervous…I decided to try making plain brownies before I try to make them fancier for a secret recipe I’m currently working on for an Earth Balance baking contest. I decided once I made these that they’ll do the trick for that purpose, and wanted to share the recipe now for just the brownies, because I think they did come out pretty good for vegan brownies. My mom has a family recipe she uses that aren’t vegan, and I looked at that to get some ideas, but her recipe has way too many eggs to be able to veganize, as well as way too much margarine for my liking.

So here is the recipe:

Ingredients:

  • 1 1/2 cup unbleached all purpose flour
  • 1/2 cup unsweetened cocoa powder
  • 1/2 cup vegan white sugar
  • 1/2 cup brown sugar
  • 1/2 tsp baking powder
  • 2 tbsp flaxmeal
  • 6 tbsp water
  • 1 stick (8 tbsp, or 1/2 cup equivalent) earth balance margarine, melted
  • 1/3 cup applesauce
  • 1 tsp vanilla extract
  • 3/4 cup non-dairy milk

Directions:

  1. Preheat oven to 350 degrees Fahrenheit.
  2. Mix dry ingredients (except flaxmeal) in a bowl together.
  3. Make 2 flaxmeal “eggs” by whisking the 2 tbsp flaxmeal and 6 tbsp water together. Let sit until thick.
  4. Mix flaxmeal “eggs” and the rest of the wet ingredients into the dry. It should have a runny yet thick consistency.
  5. Place in a baking dish sprayed with oil.
  6. Bake brownies for 20-30 minutes. I recommend after 20 minutes starting to check with a toothpick inserted into the middle until it comes out clear every five minutes and adjusting the time if it seems it will be done in less than 5. I find that ovens can vary drastically from oven to oven, so I want to make sure it works for you and say this! 🙂
  7. Take out of the oven when done. Let sit until cooled most of the way or fully, and slice, and enjoy!

Vegan Lifestyle post: Sabon NYC- a vegan friendly bath and body company

photo (54)So my birthday is coming up at the end of the month and I told myself that for my birthday I was going to restock up on and try some new products from Sabon.

According to their website, almost all their products are suitable for vegans, except these (taken from their faq page):

A short list of our products may be avoidable by Vegan’s. Below is a list of products that contain animal or human byproducts: Body Butter (contains Beeswax) Candles (contains Beeswax) Vanilla Mask (contains both Collagen & Elastin) A&E Mask (contains Lanolin) Night Cream (contains both Collagen & Elastin) Desert Flower Moisture Lotion (contains Elastin) Loofah Soap (contains Sea Cucumber)

I first discovered their company when I lived in Boston and they had had a store location there (it has since went out as far as I know). They had a cool bath type fountain thing where every time you went in their they’d give you a free treatment. It was usually a hand wash type product, then their amazing scrubs (you could select what scent you wanted to try), and then try a lotion. The scrubs were what originally drew me in. And then I discovered they had a whole range of products with this amazing scent combination of patchouli, lavender, and vanilla. It is seriously my favorite scent now. But I would not try it at first because I hate the smell of patchouli on it’s own. When I did though, I became obsessed.

The only thing that really sucks is that the location near me went out so I can’t buy it except online. It was awesome though because apparently since I live somewhat close to NYC the shipping came amazingly fast.

The website has free shipping if you spend $100, but they also sometimes have special deals on shipping, and other types of sales very often that you can find out about if you are on their email list.

The other things I like: Most of their products are packaged in glass. This is much safer for our bodies (unless you drop it in the shower!) and more recyclable than plastic. Their customer service is awesome (I had a few minor issues trying to add the free birthday gift they said I could get during my birth month and called them and they were very kind and easy to interact with). It’s also the best smelling product ever, at least in my opinion, if I haven’t mentioned that enough.

I’m trying to wait until my birthday to try all the products. But I did try their body dew which is a water based perfume basically, and I love that. I also stocked up on body lotion, shower gel and oil, and body oil. They gave samples of the hand and foot lotions.

Now I will smell really good for a while! Yay!