My vegan donuts

I’ve been all forlorn because there are now two places in my city that have vegan donut options, but I am essentially too broke to buy them. Everyone I know that’s vegan seems to be posting them on social media, and it made me want donuts SO BAD.

So, I made up my mind to make some of my own.

IMG_3730

I used this recipe for the donuts but substituted the shortening for coconut oil (using 1 1/2 tbsp).

I fried them up, choosing to make them without holes because I thought I might add a filling inside. I used Chloe Coscarelli’s recipe for chocolate ganache as a topping.

IMG_3731

On half of them, I applied some vegan sprinkles from Sweetapolita’s shop.

IMG_3733

On the other half, I used Chloe’s filling frosting in the recipe above (made with half coconut oil and half veggie shortening I’m trying to use up), and separated it into three bowls, colored it with my natural food colorings (red, yellow, green), and then got super frustrated trying to use this icing bag contraption I bought that’s supposed to make it easier to pipe out multiple colors at the same time. I don’t think it was that easy, but it did come out very nice.

IMG_3732

I think next time it’d be better if I fill the insides with the frosting and don’t color it. It got really melty on top because it’s summer and I ended up refrigerating them.

BUT THEY ARE SO GOOD! They helped me wake up early this morning because I knew they were waiting for me, and I was able to get a ton of humane education work done because I was up so unusually early. 🙂


The most perfect gluten free vegan chocolate chip cookies

IMG_1994

I basically honed my baking skills as a kid by making chocolate chip cookies from an alphabet cookbook for kids. It was the only recipe I used, and they always came out perfect. I thought my mom had thrown out the cookbook, but I recently found it and I had to veganize them and make them gluten free. The result was so perfect I was astonished!

Here it is:

Ingredients:

  • 1/2 cup white vegan sugar
  • 1/2 cup organic brown sugar
  • 2/3 cup melted Earth Balance or refined coconut oil
  • 1 tbsp flaxmeal
  • 3 tbsp warm water
  • 1/2 tsp baking soda
  • 1 1/2 cup Bob’s Red Mill All Purpose Flour
  • 6 oz vegan chocolate chips

Directions:

  1. Preheat oven to 375 degrees F.
  2. Whisk flaxmeal with water in a small cup. Let sit and whisk several times until gelled.
  3. Mix together the sugars, melted Earth Balance or coconut oil, and flax egg.
  4. Stir in flour and baking soda.
  5. Add in chocolate chips.
  6. Form dough into small balls and place onto an ungreased cookie sheet. The recipe should make about 24 cookies.
  7. Bake for 10-12 minutes.
  8. Let cool and place on a cooling rack shortly after they come out of the oven.
  9. Enjoy ! I know I will!

IMG_1996


Hi! A recipe for the best vegan mashed potatoes ever and some soy curls.

Okay, so I’ve been meaning to make mashed potatoes out of cashew cream, and finally did. The results are amazing. I need to share it with you, alongside an air fryer soy curl recipe. Put these two with some green veggies and maybe some cornbread if you want, and you have a whole meal!

img_1535

Mashed potato recipe:

Ingredients:

  • 4-5 large potatoes of choice, peeled and chopped
  • 1 cup raw cashews, either soaked in water overnight or boiled with water covering them for 15 minutes
  • 1 cup water
  • 1 tsp salt
  • 2 tbsp vegan margarine
  • 2 tbsp nutritional yeast
  • 1 tbsp dried or fresh chives
  • Salt and pepper, to taste

Directions:

  1. Boil the cashews if necessary. Allow to cool.
  2. Boil the potatoes in a pot of water (just enough to cover them). I start a timer once the water boils for 15 minutes, and they’re almost always ready for me after that. If you’re not sure, test to make sure a fork can smoothly go into them before you stop boiling them.
  3. Blend the cashews, water, and salt in a blender while the potatoes are cooking. Set aside. You want the cream to be smooth, not chunky, so make sure you blend for long enough to achieve this. I do think it works better when you boil the cashews as opposed to soaking them.
  4. When the potatoes are cooked, drain the water.
  5. Place back in the pan. Mash together with the vegan margarine and cashew cream.
  6. Fold in the nutritional yeast, chives, and salt and pepper as desired.

Enjoy the delicious creaminess. They taste even better when you reheat them the next day.

For the air fried soy curls, here is what I did:

Ingredients:

  • 2 cups soy curls soaked in water with vegan chickun broth or veggie broth
  • 2 tbsp soy sauce or gluten free tamari, added to the soaking broth
  • 1 tbsp liquid smoke, also added to the soaking broth
  • 2 tsp oil
  • 1/2 cup gluten free Bisquick mix
  • Seasoning as desired, I sprinkled some cajun seasoning on top before placing them in the air fryer

Directions:

  1. Soak the soy curls for 15 minutes.
  2. Drain (but don’t rinse!)
  3. Coat the soy curls in the oil, then sprinkle on the Bisquick mix.
  4. Stir around a bit until the soy curls are completely coated.
  5. Place in the air fryer for 12 minutes at 350 degrees F.
  6. Enjoy along side the mashed potatoes with your favorite dipping sauces.

Hope everyone is having a wonderful February so far!

Air Fryer Experiments

Hi!

As I mentioned in my last post, I bought an air fryer on sale. What is an air fryer, you ask? Well, it’s basically a healthier version of a deep fryer. It fries food with hot air instead of oil.

Personally, I am still figuring out what works and doesn’t work with it and trying to perfect temperatures and cooking times. I have found that using a lot of liquid batter without any kind of dry coating over it does not work so well. It says you can make donuts in it, but I have no clue how that’d work. I have not tried cooking french fries yet, but I really want to, just haven’t yet.

So far I have fried some soy curls using this recipe here. Those came out excellent, I think I cooked them at 350 for about 10 minutes. I also tried defrosting some Gardein chicken scallopini, coating it in watered down Neat egg substitute coated with vegan/gluten free rice crispy-esque cereal. That was okay, but not that exciting even though I had high hopes.

Then, when I botched a bunch of battered cauliflower, I came up with a splendid idea. But I didn’t have any more cauliflower, so I tried it with tofu. It’s supposed to be like coconut coated fried shrimp, but is made with tofu (and someday I need to try it with cauliflower, too!)

fullsizerender

Here is the recipe for it:

Coconut Crusted Air Fried Tofu

Ingredients:

  • 1 cup chickpea flour
  • 1/2 cup cornstarch
  • 1/2 tsp baking powder
  • 2 tsp salt
  • 3/4 cup water
  • 1/2 cup vodka or unflavored soda water/seltzer
  • 2 tbsp peanut or vegetable oil
  • one bag sweetened shredded coconut flakes
  • sweet chili sauce for dipping
  • 1 block tofu, preferably frozen, thawed, then pressed for 20 minutes

Directions:

  1. Combine flour, cornstarch, baking powder, and salt in a medium-sized mixing bowl.
  2. Whisk in the water, vodka/soda water until a liquid, medium thickness batter forms. Water it down if necessary to be the desired thickness, but it should stay fairly thick.
  3. Cut tofu into smallish rectangles.
  4. Place some of the sweetened coconut into a dish.
  5. Dip the tofu in the batter, then into the coconut.
  6. Delicately place in the air fryer tray.
  7. Air fry for 10 minutes, 350 degrees F or slightly lower if you don’t want it as browned as I did. May take some experimentation as I believe air fryers can vary quite a bit.
  8. Use sweet chili sauce to dip in, and serve with a generous helping of veggies!

I’m sure I’ll discover some new tips and tricks about air fryers soon!

So check back here for those.

Until then, or until another recipe creation strikes!

Take care! xo


Holiday Recap and a Soy Curl Potpie Recipe

I’ve been so busy lately. Between graduate school, taking an improv comedy class, the holidays, my grandmother dying, etc., I’ve barely had time for cooking. I was able to create two Youtube videos in the beginning of the semester, which you can see here: https://www.youtube.com/channel/UCIGj10TPGenVBNH6vySDPpw! I hope to make more videos on Youtube in the coming year.

I’ve also been regularly updating my blog’s new(ish) Instagram account, which you can follow @bananacurlvegangirl

If you’re not on Instagram or following along here, I’m going to do a quick photo recap of some of the food I made for the holidays.

For some homemade gifts, I made my famous sour cream and onion kale chips, green tea, goji, and coconut superfood energy bars (adapted from this recipe), vegan and gluten-free marshmallow wreaths, and chocolate peppermint patties from a recipe that’s basically this (not pictured).


We had 4 relatives staying with us from Christmas Eve day until yesterday. My aunt and uncle and cousins have a tradition at their house of making appetizers on Christmas eve. So, I made lentil faux chopped liver dip, a spinach and artichoke dip, and we made mini potato latkes because it was also the first night of Hanukkah and my dad celebrates the holiday and loves having latkes. Instead of using eggs, we used the Neat egg for the first time and it worked out really well! There was also a salad made that I was able to eat.


For dessert, I had these gluten-free, vegan sugar cookies I made from a recipe on Minimalist Baker. Check the recipe out here.

gf sugar cookies xmas.JPG

For Christmas morning breakfast, everyone else was having bagels. My mom was nice enough to go to a local gluten-free bakery and pick up some vegan and gluten free bagels. I topped them with Kite Hill chive cream cheese, my papaya lox, and capers.

lox-bagels

For my dinner later that day, I made gluten-free, vegan stuffed shells with Kite Hill almond ricotta and pesto. I forgot to take a picture of them. We also had my favorite vegan caesar salad ever, which I also forgot to photograph, but believe there are previous posts on this blog about it.

It was a sweet Christmas! I hope you had a very merry one yourselves! As a thank you for reading, here is a picture of my three cats, that my brother photoshopped for a card.

christmas-cats

However, the best Christmas present is that I have a new recipe! For a soy curl chickun potpie that is soooo good!

WordPress has a new feature here, so I’m going to try to see what happens when I upload a word document of the recipe.

soy-curl-chickun-potpie (link to a downloadable recipe? or something)

Soy Curl Chickun Potpie

Vegan and Gluten-free

Ingredients:

  • 2 cups soy curls
  • ½ cup frozen peas
  • ½ cup frozen corn
  • 1 medium potato, chopped
  • 6-8 baby carrots chopped into rounds
  • 1 tbsp olive oil
  • 1 stalk celery, chopped
  • one small onion, chopped
  • 1 clove garlic, minced
  • 2 tbsp nutritional yeast flakes
  • 1 tsp dried rubbed sage
  • ½ cup vegan no-chicken broth, divided
  • 1 tbsp vegan butter or coconut oil
  • 3 tbsp garbanzo flour
  • 1 cup unsweetened plain coconut milk
  • 1 no-chicken bouillon cube
  • Salt and pepper, to taste
  • 2 gluten-free, vegan pie crusts, homemade or store bought

Directions:

  1. Preheat oven to 350 degrees F.
  2. Soak soy curls, corn, and peas in a bowl with enough warm water to cover. Let sit for at least 10 minutes and drain. Set aside.
  3. Steam potatoes and carrots in a steamer basket for 10 minutes.
  4. Place olive oil, celery, onions, and garlic in a skillet on medium heat and sauté until soft. Add in the soy curls, corn, peas, nutritional yeast, sage, and ¼ cup broth. Mix in the potatoes and carrots. Stir and heat until the soy curls are warm.
  5. To make a gravy for the pie, place the vegan butter and garbanzo flour in a saucepan over medium heat. Whisk until crumbly and beginning to brown. Slowly add in the coconut milk, continuing to whisk. You may need to lower the heat. Add the remaining ¼ cup broth and the bouillon cube. Keep whisking until the bouillon melts and the gravy is thick. You can add salt and pepper to taste once you turn off the heat.
  6. Add the gravy into the soy curl and vegetables.
  7. Spoon into a bottom of a pie crust. Place the top of the pie crust as you like it. Make slits in the top to allow steam to escape. You may have some leftover filling that you can eat separately or make into other dishes.
  8. Bake for 30 minutes or until the crust is golden in color.
  9. Allow to cool slightly before serving.
  10. Bon Appetit!

Enjoy the new year festivities if I don’t post before then (but I do have several posts lined up!) Happy Holidays from Banana Curl, Vegan Girl!


Buffalo Soy Curls Recipe and a review of Daiya’s Blue Cheese dressing

Whew, this summer has been so busy! So much happening in my life right now.

Girls Rock camp starts on Monday and I am super excited to help feed people there.

Today I was in the grocery and came across Daiya’s new salad dressings. I was intrigued by the blue cheese one. I never really liked blue cheese, and I hated chunky versions of the dressing. I only liked it if it was smooth. But I decided to purchase it on a whim, and then suddenly had the great idea to make something buffalo style to accompany it.

I came up with a recipe for buffalo soy curls.

IMG_9023

The recipe is as follows:

Ingredients:

  • 1 bag Butler Soy Curls
  • Water to cover soy curls
  • 1/4 cup chickpea (garbanzo bean) flour
  • 2 tbsp nutritional yeast
  • 1 tsp garlic powder
  • 1 tsp onion powder
  • 1/4 tsp black pepper
  • 1 bottle Frank’s Red Hot sauce

Directions:

  1. Soak soy curls in a bowl covered with water for 10 minutes.
  2. Turn oven to broil.
  3. Drain soy curls.
  4. Place flour, nutritional yeast, garlic and onion powders, and pepper in a ziplock bag.
  5. Toss soy curls into ziplock bag.
  6. Spray a wide-rim baking sheet sprayed with cooking oil.
  7. Dump out soy curls out of bag and spray the tops of the soy curls with oil.
  8. Place in the broiler for about  5 minutes (watch them carefully, every oven broils slightly different, you may require more or less time).
  9. Toss, flip, or stir soy curls around a bit. Place back in the broiler for 2 minutes.
  10. When the soy curls are starting to get crisp and slightly brown, take out of the broiler and pour the hot sauce on top.
  11. Broil for another minute, then take out of the oven.
  12. Serve with celery and vegan blue cheese.

IMG_9025

REVIEW OF THE DAIYA BLUE CHEESE DRESSING:

Despite my reservations, I was quite impressed. It’s been ages since I’ve had the real thing, but once I tasted it I had to re-check the ingredients to make sure Daiya hadn’t pulled a fast one on me. It’s very convincing and there’s no chunkiness. Woohoo! It’s perfect for taming buffalo stuff.

Hope your summer is going well too!

New Favorite Things

I want to post more often here, but am finding it hard right now to find time to create my own recipes due to a busy summer full of classes, volunteering, and other events.

So, I figure I might as well post some other vegan food related stuff, as I’ve always done, and not beat myself up for not creating new recipes as frequently.

I actually have a recipe I created awhile ago that I’ve been saving in hopes that I could use it for my youtube channel I want to start eventually. It was a cupcake recipe, that was not gluten free at the time, and now since I cannot eat it, it doesn’t make sense to hold onto for the video. So, keep an eye out for that.

For now, I want to make a post about some of my new favorite vegan food things.

Rice Paper Bacun:

Ohemgee, this is a life changer, and completely gluten free (although some brands of rice paper are not, so read the ingredients carefully!) If you follow vegan food trends at all, I’m sure you’ve heard of this somewhere. If not, here is the scoop: You cut rice paper (the stuff you use to make summer rolls) into strips, soak it quickly in warm water, dip it in a marinade (this is the marinade I use–warning, there are a lot of spelling errors but don’t let those annoy you too much, it’s delicious despite a bit of confusion), and then fry it in a pan with some coconut oil until crispy. You can apparently bake them too, but I don’t think the results would be as good.

Here are two pictures of it, one for breakfast and one used in a salad.

IMG_8405

IMG_8194

Red Pepper Jelly:

Somewhere on the vast corners of the (vegan) internet, I got the idea to try red pepper jelly on gluten free toast with Kite Hill plain almond cream cheese.

It is too good for my own good.

IMG_8206.JPG

It’s the perfect ratio of spicy to sweet.

Fakemeats.com:

I discovered some amazing new products at fakemeats.com. You can get discounts when you order a certain amount of certain products, like Louisville Jerky. Including their limited edition pepperoni flavor!

IMG_8352

I have tried all but that sausage looking thing so far. All delicious. I proceeded to make a gluten free pepperoni cashew cheeze vegan pizza with the jerky. So good! (This picture is also missing the 6 bags of soy curls I purchased with free shipping at a really good price).

IMG_8357

Best for last:

Finally, and this is definitely a case of saving the best for last…*drumroll please* THERE NOW EXISTS A VEGAN PEANUT M&M ALTERNATIVE!!

IMG_8200

Yes, this is a picture of an empty package. Yes, my mom (who hasn’t had peanut M&Ms for over 20 years because she is lactose intolerant…longer than I can say…) and I ate these all in the car ride home from the grocery. They are that amazing. They taste best when you eat them one after the other…;)

Anyways, there’s the vegan food stuff I’ve been most excited about lately. Let me know if there’s something else I should investigate like these that would be up my alley!

Take care and have a fun week!


Adventures in Ethiopian Cooking

Over the holidays, I got a vegan Ethiopian cookbook, Teff Love, by Kittee Berns, for a present.

IMG_7616


I have loved Ethiopian cuisine since I lived in the Boston area, where I used to go to a restaurant in Cambridge, MA called Addi’s Red Sea. It is a very vegan friendly cuisine. Vegnews recently shared a story that has more about Ethiopian culture and their food and why it’s so vegan-friendly. Check it out here.

At first I only had the time and energy to try the Ethiopian style tofu scramble recipe. I’m pretty sure I could eat that almost every day for the rest of my life and not get sick of it. What really makes it is the berbere spice, the signature spice mix for the cuisine…although I’m a baby when it comes to spice and so I reduce it by quite a bit.

IMG_7443

You can get it in the international section of Whole Foods, among other places, I am sure.

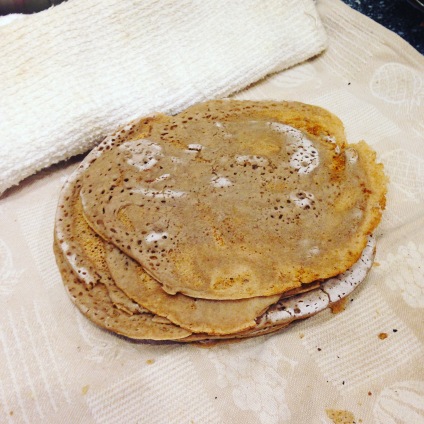
One of the best parts of the food is the Injera, the spongy, crepe-like sourdough bread that you eat everything with. It can be used instead of utensils. It’s naturally gluten free (made from teff flour–which inspired the name of Bern’s cookbook). However, it takes up to a week to fully make, which is a bit complicated…but worth it if you can figure it out. If you are pressed for time though, the book has a teff crepe recipe which is really awesome as well.

IMG_7439

Another great aspect of Ethiopian food is that it makes a lot of food, and it lends itself to making multiple dishes and feeding lots of people.

For example, the first time I made it, I gave some to my friend who had just had a baby as part of a meal train.

Here’s a picture she took of her plate:

IMG_7473

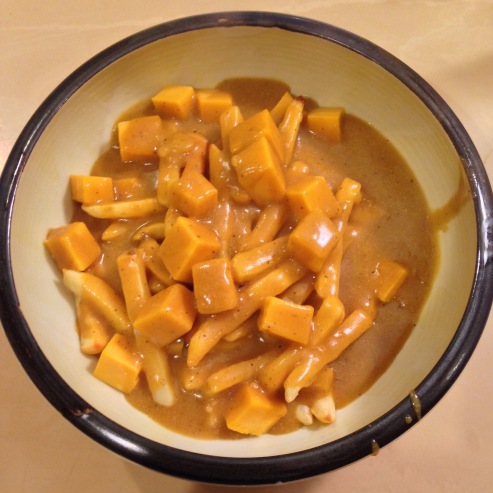
And here is one of my favorite pictures of my own plate (one of many):

IMG_7455 (1)

Also, my dad happens to work with someone from Ethiopia, who ended up giving me a huge jar of Teff flour! It was very exciting as it’s like hitting the teff jackpot!

IMG_7508

After making a large batch of food for myself and my friend and her family, I made a dish by itself. It is called ye’zelbo gomen be’karot, which is kale with carrots, onions and mild spices. It’s seriously the best kale dish I’ve ever eaten, and that is saying a lot (I love kale) and my whole family loves it.

Speaking of which: yesterday (Wednesday April 7), after spending the weekend in my kitchen making a big feast for Monday, only to have snow (!!!) cancel the class, I served the small college program, College Unbound, who helped me get my bachelor’s degree, the feast as well! I kept raving about the kale dish to everyone, and one student said she doesn’t like kale, but I got her to try it anyways, and she really liked it! Her cousin who was also there, was claiming she might need to contact the local news channel because I had her trying foods she’d never tried before, and she’s usually so picky…which was a big compliment for myself and the author of the cookbook! Here are a few pictures of some of the other students posing with their plates:

Also, the majority of the students had never had Ethiopian food before when we asked. Most people who tried it were not put off by the fact that there wasn’t meat in the dishes, which can happen sometimes when I am feeding large groups (or at least they didn’t say it to my face! haha). I had one person comment to me that the split peas in mild sauce (called ye’ater kik alicha in the book) had a meatlike texture. My friend Domingo, who is pictured in the first picture above, was excited also that I made the vegan Ethiopian style mac and cheesie, because he’s lactose intolerant.

It was a really positive experience for myself and all involved. Especially because I could effortlessly share my love of another culture’s food and share that vegan food doesn’t have to be bland, boring, or leave you craving protein (in fact, the red lentils in spicy sauce, in a dish called ye’misser wot, have 15g of protein per serving, according to Teff Love!). I hope to do it again soon.

And I can’t recommend the cookbook Teff Love, enough!

Vegan Poutine Recipe

IMG_7500

Hi!

I am slowly making my way through the backlog of stuff I’ve been meaning to post! Soon you’ll also get to hear about a delicious raspberry cake batter smoothie I made and adventures in vegan Ethiopian cooking (a cookbook review).

Not too long ago I really wanted some comfort food, and I had been contemplating using the block of Daiya cheddar cheese I had in my fridge for poutine for awhile. So, I finally did it.

The gravy was spot on, but next time I will melt the cheese a little bit more on top of the fries in the oven so that when I pour the gravy on it all it will melt even better.

Here is the recipe:

Ingredients:

  • 6 tbsp Earth Balance or refined coconut oil
  • 1/4 cup gluten free or regular flour (I used brown rice flour)
  • 2 cloves garlic, minced
  • 3 cups No Beef Broth (from the Happy Herbivore cookbook if you have it, or from here)
  • 1 cup vegan unchick’n broth, or vegetable broth–It’s fairly easy to find vegan unchick’n broth powder–several companies make it and I’ve even found variations of it in dollar type/discount stores near me! Just mix 1 tbsp broth powder with one cup water or veggie broth! Happy Herbivore also has a recipe for making your own broth powder
  • 2 1/2 tbsp cornstarch mixed with 2 1/2 tbsp water
  • Black pepper, to taste
  • About half a package of your favorite frozen french fries, or homemade if you want to get fancy. I used Alexia brand Straight Cut Fries
  • 1/2-a whole block Daiya Cheddar, cut into 1 inch cubes

Directions:

  1. Start by preheating the oven to the temperature the fries are baked at.
  2. Make the no beef and unchick’n broths, allow to cool slightly
  3. Prepare fries according to package…in the meantime prepare the gravy.
  4. Melt the butter or coconut oil in a large saucepan. Add the flour and stir constantly until a roux is formed. This is when it turns into a golden brown color. It takes about 5 minutes.
  5. Add in the garlic and cook for about 30 more seconds.
  6. Stir in the broth with a whisk.
  7. Bring to a boil.
  8. Whisk in the cornstarch and water, stir constantly and let simmer until thickened, about 3-5 minutes…it’s possible you might need slightly more or less cornstarch. I started with 2 tbsp water/cornstarch and then added the extra 1/2 tbsp later when it would not thicken to my liking.
  9. Keep gravy warm (this can be done by turning off the heat and covering, leaving on the stovetop that you cooked it on.
  10. In the last few minutes of cooking the fries, gather them up into the middle of the tray, and randomly drop the Daiya cheddar blocks on top. I’d say only do this for 5 minutes at maximum but do it however you like really.
  11. Take the fries and cheese out, place in a large bowl, and put as much gravy as you like, I probably put close to 4 cups on top. You will have extra gravy that you can use for more poutine or something equally delicious.
  12. Maintenant, nous mangeons! (That’s French for now, we eat!) Enjoy!


Better than Cadbury Cream Eggs! (vegan, fair trade, and gluten free) with update for palm free/gmo free recipe

Hi!

IMG_7202

I’ve been wanting to make a vegan chocolate cream egg since…well…every year I’ve been vegan. This year I finally decided to take action.

IMG_7208

I bought an egg shaped mold from a craft store and everything. However, I found a recipe on one of my favorite blogs, Hell Yeah It’s Vegan which does not require a mold (and I think comes out better if you don’t). Please check the blog out beyond this recipe. It’s amazing!

Originally I just made some simple adjustments to the recipe. Instead of using yellow and red food coloring, I made the yellow out of water and powdered turmeric. I also changed the method a bit, instead of using two disks I used one and just free-styled the yellow part of the egg by placing it in the center and wrapping the white part around it and shaping it into an egg shape. It was actually really easy in terms of making candies and other stuff.

The chocolate I used was Equal Exchange Fair Trade chocolate chips which I am really passionate about buying from now on. Not only are they conflict/child labor/slave labor free and on the Food Empowerment Project chocolate list, but they’re also the best tasting chocolate and worked like a dream.

But I was annoyed that I was making these with Earth Balance, which has palm oil in it, and corn syrup, which is often gmo and not organic (genetically modified). So I had to totally revamp the recipe. It works just as well if not better. The updated recipe is below!

Of course, these are also gluten free and also nut free (if you don’t consider coconut a nut!)

Chocolate Creme Eggs–vegan, gluten free, palm oil free, fair trade, organic

Ingredients:

  • 1/2 cup plus 2 tbsp brown rice syrup
  • 1/4 cup plus 2 tbsp refined coconut oil (solid) –plus 2 tsp for the chocolate
  • 2 tsp vanilla extract
  • 1 tbsp water
  • 3 cups organic/gluten free powdered sugar
  • Ground turmeric and water, as needed
  • 8 oz (or more, just use the full bag) fair trade, vegan chocolate chips

Directions:

  1. In a stand mixer, cream the brown rice syrup, coconut oil, vanilla extract, and water together.
  2. Slowly incorporate the powdered sugar into this mixture, blending until well combined. If it is hard to mix add a small amount of water, no more than an 2 additional teaspoons.
  3. Place a small amount of the mixture into a small bowl (a third or less of it), and sprinkle the turmeric powder and a small amount of water (you do want this to get a little runny), use a small whisk or spoon to stir it together until it all incorporates and is a bright yellow color. It will be hard to combine at first.
  4. Cover both bowls and place them in the refrigerator for an hour or more. If you are short on time you can place them in the freezer for no more than 30 minutes.
  5. Cover two cookie sheets with parchment or wax paper.
  6. With a small spoon, place little blobs of the yellow mixture onto the tray. You want to aim for about 15 nickel size pieces.
  7. Then shape the white mixture into 30 flat egg shaped discs and place on the other tray.
  8. Place the white ones in the fridge and the yellow in the freezer for 20-30 minutes.
  9. Take one white disc, place the yellow blob and put it in the middle, then place another white disc to form a sandwich. Smush together and then shape by rolling in between your hands into an egg shape. Continue on with the rest of them. It’s okay if some of the yellow is oozing out, it gets better looking results that way.
  10. Place again in the freezer for a half hour (or more).
  11. Melt the chocolate with 2 tsp coconut oil in the microwave or a double boiler.
  12. Dip the frozen eggs fully into the chocolate one by one, placing on a cookie sheet with a fresh sheet of parchment paper or wax paper to set. I have found that the best method is to use a spoon to roll the egg in the chocolate and then carefully take out of the chocolate, letting the excess drip off back into the chocolate, and then placing onto the tray. They will not be perfect, you may have some drips that deform the egg shape. Once you let them set you can break those off a little bit.
  13. Place in the refrigerator or freezer to set fully. I like to keep a big batch of them wrapped in foil in the freezer, and when there is a day that I want one, I place it in the fridge for a few hours, let it sit out for a little longer at room temperature, and then dig in! They are so good.