Vegan MoFo 2017 Day 27: Meals for the young (at heart) unicorn bento

unicorn bento box 2 of 3

Obento is the Japanese art of lunch making that is not only healthy and delicious but also visually appealing. In the United States where I (Laura) live, bento box lunches have caught on a bit, although they often don’t follow the Japanese tradition as much, which usually has a good portion of the meal as rice.

I love looking at pictures of creative bento boxes. They have bento box pictures for almost any animal or cartoon character you can think of. I especially like when the compartments of the box all work together to create one image, but I’d say that’s a more advanced bento artistry skill than where I am at now.

Usually the pictures I see feature nonvegan foods in them, so naturally, I was interested in contributing some vegan pictures of bento box lunches.

I know when I was in school as a vegetarian, other students used to make fun of my lunches because they looked weird or I ate different kinds of food. Though I don’t have kids of my own, I wonder if, especially with younger ages, bringing colorful and artistic bento lunches could get vegan kids to feel more comfortable at lunchtime. Other kids would hopefully be curious and excited to see what’s in the child’s lunch every day, especially if you take a creative approach to it. It would lessen the chance of bullying, and even maybe get them interested in vegan food.

It does take a bit of planning and time, although, it actually took me less time to make it than most of the meals I make for myself.

unicorn bento box 1 of 3

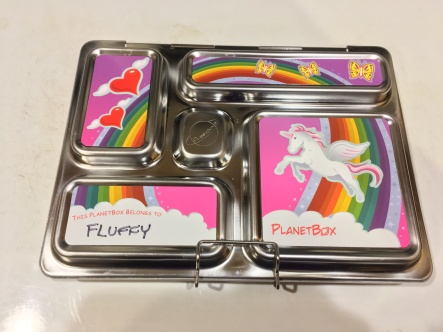
The bento box I used was from PlanetBox (of which I get no benefit from promoting, I just liked them) which is an eco-friendly company. They have several different styles and come with little sealable containers as well. Each box style has the option to get decorative magnets included (free of charge). Obviously, I chose the Rover for its rainbow unicorn magnets. It appears that those magnets are currently sold out on PlanetBox’s website when I just looked, I wonder if they’ll be making them available again or not.

Because I wasn’t going to be taking my lunchbox anywhere or letting it sit in the fridge for awhile, I may have been able to get away with a little more. I wonder how transporting the food would work. I think the compartments keep the food well separated, but it did say in the instructions that came with it to put particularly juicy or runny foods in sealed containers rather than let them be freeform. So, that’s something to keep in mind if you’re going to use it as an actual lunch. I like the structure and challenge creating a bento box provided me. It helped me think differently about creating a complete meal.

unicorn bento box 3 of 3

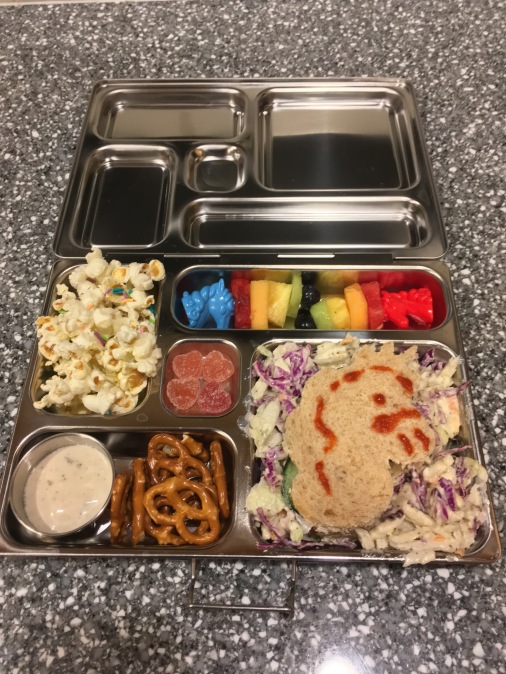
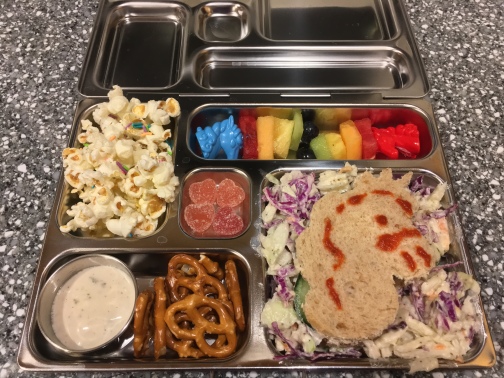
Here is what I did with mine:

  • I made a vegan coleslaw and added extra purple cabbage to make it more worthy of a unicorn.
  • I placed a tea sandwich shaped like a unicorn and decorated it with sriracha. For kids, I’d recommend some other squeezable sauce unless they like sriracha and spiciness.
  • I took the unicorn corn-on-the-cob holders and used them as skewers for rainbow fruit salad. You could use toothpicks or other decorative pointy items as well. Just remember that most schools have a no-tolerance policy for anything that resembles a weapon, so don’t go putting them on fake mini-swords or something. Use common sense, know your kids’ schools’ rules. If you want to avoid the skewer idea, you could use small cookie cutters and cut fruit into shapes.
  • I made some kettle popcorn out of kernels in my Whirley Pop. When it was all popped, I mixed in melted vegan butter, purple colored sugar, sprinkles, and a kettle corn flavored popcorn shaker that I got from the grocery that happened to be vegan. It came out delicious. If you want to save time though, buy a bag of kettle corn and add sprinkles of your own.
  • I put Just Ranch in a container for dipping gluten-free pretzels in.
  • I put a few Surf Sweets vegan heart-shaped gummy candies in the middle. You could also put some vegan fruit snacks, a small amount of rainbow colored candy, small cookie, etc.


There are many more options! Get creative.

Other items that would be neat:

  • Rainbow dipping veggies (especially if you can find some baby purple carrots)
  • Hummus or nut/seed butter
  • Rice or noodles
  • Salads (greens, potato, pasta, etc)
  • Vegan hot dogs/sausage (you can make them shaped like octopi by cutting them into small pieces horizontally and then cutting legs with vertical cuts
  • Tofu scrambles or tofu no egg salad
  • Breakfast for lunch with some kind of colored pancake in a cool shape or design or as a pancake sandwich, options are unlimited
  • Etc.

There are lots of bento box props, tools, and other neat stuff you can buy online or in stores. A lot of Asian markets will have stuff like this as well as bento boxes. Small cookie cutters, squeeze bottles, containers, cupcake liners, stuff found in the baking section of craft stores, pretty printed parchment paper, foil, old toys, etc. can all enhance your design or serve a function in the bento box as well.

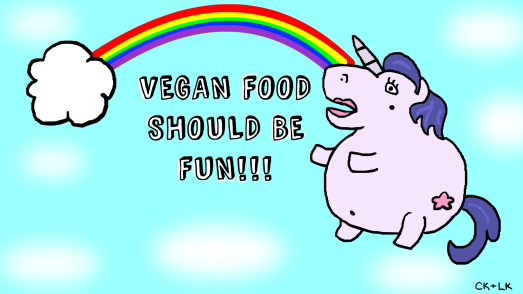
Remember, as Fluffy says:

Fat Unicorn


Vegan MoFo 2015: Day 9: Post #7 Most Retro Recipe: Ambrosia!!

Gosh, I’ve been so busy! In addition to being up to my eyeballs in school work, I also performed my comedy routine for the first time over the weekend! It was fun yet scary.

Today’s prompt for MoFo is to create the most retro recipe.

The most retro recipe I can think of besides like, disgusting jello molds and jello salads which would be a huge challenge to veganize, is AMBROSIA SALAD. I think I read a book when I was younger about a family who loved food that had some recipes in it. I’m pretty sure the only one I made from it was an ambrosia type fruit salad. I had never had this kind of a thing before, but I became obsessed with the idea of it after reading that recipe. It had mayonnaise in it though instead of what I guess is typically sour cream (here it’s the tofu and water), and was pretty gross. But I sometimes see ambrosia salads and want them. This one is much better than I remember that recipe being. Though ambrosia is said to be the food of the gods (in greek mythology), and this is definitely pretty tasty, if I was a god, I think I’d choose some chocolate…but I guess chocolate wasn’t around until later…

IMG_4237

Ingredients:
IMG_4235 (1)
  • 1 can Trader Joe’s Coconut Cream, stirred well. If you open it and it’s not liquid, you may need to take an electric mixer and whisk it a bit (also, if you cannot get this product, try regular canned coconut milk with a bit more tofu blended…maybe the whole block)
  • 1/2 block (or whole block if using regular coconut milk) extra firm tofu
  • 1/4 cup water
  • 2 tbsp sugar, divided
  • 1 cup pineapple tidbits, drained
  • 1 small (about 13.5 oz) natural pitted maraschino cherries (check label to ensure they’re vegan), broken in half
  • 10 oz can mandarin orange slices in juice or water (not syrup)
  • 3/4 dried coconut flakes
  • 1/2 cup chopped pecans
  • 1 package vegan mini marshmallows (I used Dandies jumbo marshmallows that I cut individually into fourths)
Directions:
  1. Pour the coconut cream into a large bowl.
  2. Blend together the tofu, water, and 1 tablespoon sugar in a blender or food processor.
  3. Pour tofu mix into the coconut cream and stir with a spatula.
  4. Add in another tablespoon sugar and mix well.
  5. Stir in all the fruit.
  6. Add in the coconut flakes.
  7. Finally, stir in the marshmallows.
  8. You can eat as is if it’s thick enough, otherwise refrigerate for a half hour before serving.
  9. Enjoy your nectar of the gods.

IMG_4239

Going gluten free. First gluten free and vegan baked good –strawberry rhubarb pie!

Well, I am somewhat relieved to finally have an explanation as to why I have been so exhausted lately. I have Hashimoto’s Thyroiditis, which is an autoimmune disorder. I also have hypothyroidism as a result of it. So, I started researching what else I can do that will help me to feel better besides what my doctor is doing for me. And I kept seeing the benefit of going gluten free. I know I seem to have issues with feeling like crap when I eat too much gluten, so I am trying it. It’s sad for me, because I really loved gluten. I will need to learn more about baking gluten free, and I know I can do it, and be making all sorts of new delicious vegan AND gluten free stuff in the future!

In fact, I made a pie. Unfortunately, my oven and stove just randomly stopped working yesterday. I’m glad I made this before that! I have some ideas up my sleeve for the future, but they will have to wait until it gets fixed 😦

IMG_3740It’s my favorite pie of all time, strawberry rhubarb.

I actually used Bob’s Red Mill Pie Crust Mix. I had used it before and thought it was awesome even when I wasn’t gluten free.

Here is the recipe:

Ingredients:

  • 1 bag Bob’s Red Mill gf pie crust mix
  • 12 tbsp Earth Balance cut into tbsp sized pieces
  • 8 tbsp cold non hydrogenated organic vegetable shortening
  • 8 tbsp cold water
  • 1 lb strawberries, chopped into slices
  • 1 1/4 cup rhubarb, chopped
  • 1 cup vegan sugar
  • 3 tbsp cornstarch
  • 1 tbsp lemon juice

Directions:

  1. First make the crust. Follow the directions on the back of the packaging. I always need the full 8 tbsp of water it says I might need. You may need 6 or 7 like it says. I find it hard to roll out after it’s been in the fridge…but I manage to fix it up if it breaks apart a bit as it’s pretty easy to put back together.
  2. Preheat oven to 425 degrees F.
  3. While the crusts are chilling, combine the strawberries, rhubarb, sugar, cornstarch, and lemon juice into a large bowl.
  4. Take the crusts out of the fridge after the hour has passed, and roll one out into a large circle.
  5. Press into a pie pan.
  6. Pour the filling inside.
  7. To make a latticed topping, cut strips out of the second pie crust after rolling it out a bit.
  8. Place the strips across the pie. First lay them out horizontally, then vertically. You may need a spatula to help you get them off your work surface, and they will probably break apart, but it will still look nice even if they break apart on the pie. Just smoosh them together a bit if they crack or fall apart in the process.
  9. Place in the oven with a cookie sheet underneath to avoid the gooey delicious filling from falling on the bottom of the oven, making a mess and a nasty smell/smoke.
  10. Bake at 425 degrees F for 15 minutes, then turn down the oven to 350 and bake for anywhere between 30-60 additional minutes until the crust is firm and golden/brown around the edges.
  11. Enjoy! My entire family loved it. When I asked if they could tell the difference between this and a gluten based pie crust, they said they couldn’t. (I can, unfortunately, haha! but it’s still really good!)

IMG_3730

IMG_3732

IMG_3738

Vegan Papaya Lox for Bagels

Last night I bought some pre-sliced papaya because I wanted to see if I liked it without buying a whole papaya. I don’t think I have ever had it before or if I have I don’t remember. When I got home from the store, I tried a slice, but I didn’t really like it. However, the color, texture, and lack of distinct flavor led me to believe I should try making a vegan lox substitute. So, I began to make a marinade for it and began experimenting. The results were pretty great!

First you marinate the slices for about an hour in a mixture of stuff (see my recipe below) in the fridge, then you bake it at a low temp of 200 degrees F for about 5 minutes, turn up the heat in the oven to 250, bake 10 minutes, flip, and bake for 10 more. Then you will have the perfect faux lox to put on top of bagels and vegan cream cheese. I’m also going to try making it in the dehydrator I think. I’ll post more about that if (when) I do it.

IMG_2866Vegan Papaya Lox

Ingredients:

  • 4-6 large, thick slices of papaya
  • 2 tbsp soy sauce
  • 2 tbsp olive oil
  • 1 tsp kelp granules
  • 2 tsp liquid smoke
  • 1 tsp rice vinegar
  • 6-10 tbsp water (depending on how many slices you are attempting to make and what container you are marinating it in)
  • Salt, to taste

Directions:

  1. In a shallow container with a lid that fits securely and is big enough to fit the papaya and marinade, pour all the ingredients in (except the salt and papaya) and stir or whisk well.
  2. Place the papaya slices into the marinade. Flip to the other side.
  3. Close the container, and place in the refrigerator for an hour or longer, flipping halfway.
  4. Preheat the oven to 200 degrees F.
  5. Place papaya on a well-oiled baking sheet and sprinkle the tops with salt.
  6. Bake in the oven for 5 minutes.
  7. Turn the heat up to 250 and continue to bake for 10 minutes.
  8. Flip over, sprinkle this side with salt as well, and heat for another 8-10 minutes.
  9. Allow to cool or eat while warm on top of a bagel with a schmear of cream cheese!

IMG_2859

Raw papaya before being used

IMG_2862

the papaya in the marinade

IMG_2864

The papaya after it’s been cooked

Strawberry Frosted Baked Donuts

IMG_2570

Growing up as a kid in New England, I had a soft spot for Dunkin Donuts’ strawberry frosted donuts. Since they are not vegan, I can no longer eat them. But when I started experimenting with making frostings out of fruit-based syrups, I knew making something similar would be possible.

These donuts are quite cake-like, almost with a spongy texture. I still like them though. The frosting, however is wonderful. My mom said it is even better than the one at Dunkin Donuts. It is a bit different, however. But still quite good.

Recipe:

Makes 6 donuts in a single donut pan

Ingredients:

For the donuts:

  • 3/4 cup unbleached all purpose flour
  • 1/4 cup organic evaporated cane juice
  • 1 tsp baking powder
  • generous dash of ground nutmeg
  • 1/3 cup plus 1 tbsp almond milk
  • 1 tsp lemon juice
  • 1/2 tsp vanilla extract
  • 2 tbsp applesauce
  • 2 tbsp vegetable oil

For the strawberry syrup:

  • 1/2 cup strawberries
  • juice of 1/2 lemon
  • 1/2 cup organic evaporated cane juice

For the frosting:

  • 1 tbsp Earth Balance margarine stick
  • 1 tbsp organic non-hydrogenated vegetable shortening
  • 1 cup organic powdered sugar
  • 1/4 cup strawberry syrup

Directions:

For the donuts:

  1. Preheat oven to 350 degrees F.
  2. In a mixing bowl, stir the flour, evaporated cane juice, baking powder, and nutmeg.
  3. In a separate small bowl or measuring cup, mix together the remaining donut ingredients.
  4. Pour into the dry ingredients and stir together until combined.
  5. Spray the donut pan with oil if your pan is not a non-stick pan.
  6. Spoon batter into the donut pan.
  7. Cook for 12-15 minutes or longer, until the donuts become slightly gold. Check after 12 minutes and gauge from there.
  8. Take out of the oven and let cool 10 minutes.
  9. Place onto a cooling rack. You may need to take a butter knife and gently ease them out.

To make the syrup:

  1. Combine ingredients in a small saucepan.
  2. Stir continuously with a wooden spoon over low heat until thick and hot.
  3. Strain into a bowl. Allow to cool.
  4. You will have extra leftover after making the frosting which you can use on all sorts of delicious things.

To make the frosting:

  1. Cream together the Earth Balance and shortening with an electric handheld or stand mixer.
  2. Add in the powdered sugar. It will remain clumpy.
  3. Fold in the syrup, it will become soft and fluffy.

To make the donuts (time to make the donuts!!):

  1. Spread frosting around the tops of the donuts.
  2. Decorate with vegan sprinkles on top, if desired.
  3. Eat!!

Vegan Mofo 2014: Too Good Baked Good Tuesday: Raspberry Lime Rickey Cupcakes!

Hello,

Today is the day I bring you the recipe that some of my friends from RIVA (Rhode Island Vegan Awareness) have been patiently waiting for almost a month since the vegan Summer picnic in which I originally brought them to. raspberrylimecupcakes

These have, in my opinion, the best tasting frosting ever! My mom who apparently finished all the leftovers of the frosting last night when I made them again yesterday from my class would agree.

Raspberry Lime Rickey Cupcake Recipe:

Makes 14 Jumbo cupcakes (use jumbo liners and fill them 2/3-3/4 full….)

or 24 regular size cupcakes

Ingredients for the cupcakes:

  • 2/3 cup coconut oil, melted not solid
  • 1 1/2 cups sugar
  • 2 cups unflavored (plain) almond milk
  • 2 limes worth of zest
  • 1 tbsp lime juice
  • 1 tsp vanilla extract
  • 2 cups unbleached all purpose flour
  • 1 tsp baking soda
  • 1 tsp baking powder
  • ~1/4 cup raspberries, preferably somewhat mushy when you use them

Ingredients for frosting:

  • 1/2 cup earth balance
  • 1/2 cup organic non hydrogenated vegetable shortening
  • 3 cups organic powdered sugar
  • 1/4 cup raspberry lime rickey syrup (link here)

Directions for cupcakes:

  1. Preheat oven to 350 degrees F.
  2. Place jumbo liners (if using) into a muffin pan…it says you can place them onto a cookie sheet but I’m doubtful. Maybe try that if you have enough batter to make a few more cupcakes though. I just put 2 extra liners into a muffin pan that has 6 slots.
  3. Mix the melted coconut oil and sugar together in a stand mixer. Make sure you’ve already grated the lime zest and juiced the limes for the next step because the coconut will solidify more if you stop to do that after this step.
  4. Add the almond milk, lime zest, lime juice, and vanilla and mix on a low setting until combined.
  5. Add the flour, baking soda, and baking powder and mix until a batter forms. You will want to scrape down the sides of the bowl really good with a spatula, and then mix a bit more.
  6. Fold in the raspberries and mix until the raspberries combine and are no longer whole.
  7. Place about 1/3 cup into each jumbo cupcake liner, or until 2/3-3/4 of the way full. For regular size cupcakes, you will have about 2 1/4 tbsp to put in each cupcake liner.
  8. Bake for about 23-25 minutes for the jumbo cupcakes, mine were good at 24. If using regular sized cupcake liners, bake for about 20 minutes.
  9. They will be an interesting green color when done, which I thought was cool and I hadn’t actually anticipated that effect!

Directions for the frosting (beware, this frosting is seriously one of the most amazing things I’ve invented, I believe…)

  1. Cream together the Earth Balance and shortening in the mixer.
  2. Slowly add the powdered sugar, mix until large clumps form.
  3. Add the raspberry lime syrup and mix until fluffy.
  4. It becomes the most beautiful light pink color! And its flavor is totally amazing!!
  5. Frost the cupcakes after they have completely cooled, and add garnishes like a lime wedge or a raspberry on top!

photo (11)

Vegan Mofo 2014: Day 15: Meaty Meatless Monday: Jackfruit Tutorial

Hey all!

Today for Meaty Meatless Monday I want to do a bit of a tutorial/guide to cooking with Jackfruit rather than sharing a specific recipe (although I will definitely share some of my favorite recipes for it).

For those of you that don’t know, Jackfruit is a tropical fruit that is popular in regions of Asia, that happens to be, when in the right form, a fantastic faux meat substitute for vegans in terms of it’s texture. It can be used in vegan pulled pork type recipes, bbq, as a crab or tuna substitute, even in a recipe for Philly Cheese Steak, to name a few! It is rich in iron as a half cup has 25% iron, but otherwise has fairly neutral nutritional value. It is similar to tofu in that it can take on whatever flavors you cook it with, with a bit more of tangy, even sweetly sour taste.

I jumped on the jackfruit wagon as soon as I could find a way to get some, and at first that meant purchasing it from Vegan Essentials’ online store. You can find a link to the actual jackfruit here. However, since every vegan I knew in my small state had said they couldn’t find it locally, I at first did not question them, and assumed the Asian Markets had been checked thoroughly since people had said they had looked there. Well, one day I decided to question that and see for myself. And low and behold, The Chinese American Mini Market in Cranston, RI had a big shelf of them, and they were less expensive than Vegan Essentials at $1.35 a can, as well as no shipping costs were needed. Hurray!

Another mistake I see people making is that there are two different types (maybe more, I don’t know) of Jackfruit. One is a sweeter, more fruit-like kind. It typically (if referring to Chaokoh brand which is the most commonly found canned brand) comes in a yellow container, like so:

OLYMPUS DIGITAL CAMERA

This can still be used for other types of recipes, but won’t work if you want to make a shredded meat-like recipe. Notice that the can also says it is in syrup.

Instead, you want to buy young green jackfruit in brine (or water if you find other brands).  I am assuming based on the differences between the two, that this form is not as developed as the other, maybe even not quite ripe yet. Here is a picture of what you are looking for:

OLYMPUS DIGITAL CAMERA

To make it easier to remember though, I made some handy graphics to keep in mind when looking for the meaty type of jackfruit:

OLYMPUS DIGITAL CAMERA    OLYMPUS DIGITAL CAMERA

When preparing the jackfruit, you typically want to drain and rinse it before using. The easiest and best way I have found to shred it is to pulse it a few times in a food processor. If you don’t have a food processor, then it’s a good idea to simply follow the instructions the recipe usually includes that asks you to shred it with a fork, either before or after it is cooked.

Now, on to the recipes!

In books, my favorite recipes using jackfruit are from Bake and Destroy by Natalie Slater. She has a recipe for yummy bbq’d jackfruit in the crockpot (which I believe is called Cannibal Corpse Crock Pot) that she also uses on top of a yummy kale salad. She also has a recipe for a sweet potato and walnut jackfruit hash (which she calls “You Don’t Know Jack Hash”) which I absolutely loved. Check her and her book out!

photo (7)

The jackfruit salad from Bake and Destroy

The Vegan Girl’s Guide to Life by Melisser Elliott also has a really great vegan carnitas taco recipe in it.

photo (8)

The jackfruit carnitas tacos

As far as websites go, here are my favorite, tried and true jackfruit recipes:

The V-Word (a fellow Mofo-er) has a mind blowing recipe for Vegan Philly Cheesesteak.

photo (9)

Vegan Philly Jackfruit Cheesesteak!

Finally, one of my absolute favorite non-tuna salad sandwich recipes can be found here. It is amazing, and unfortunately gets gobbled up so fast every time I make it that I don’t have any pictures. It was a big hit by itself (without the melt part) at Girls Rock this past Summer amongst the volunteers!

And how could I forget? My very own Jackfruit Chick’un Noodle Soup!

photo 1 (5)

So, in conclusion, do not be afraid to try jackfruit. It’s really fun to use and delicious, and there are many recipes you can find. I hope this settles some of the confusion you might have had if you are a jackfruit newbie looking to find it and don’t know much about it, as well.

180x180_g1-1

Vegan MoFo 2014-Day 11: Thirsty Thursday-Raspberry Lime Rickeys

Growing up as a kid I loved this drink, and I still do!

Another funny story is that I first heard about this drink when I was hanging out with my Uncle Ricky, so I always think of him when I think of the delicious pairing of lime and raspberry in a soda.

The recipe requires making a syrup and putting it into plain (or lime) seltzer water.

It will also be used later on (September 16!) in an amazing cupcake recipe that some people I met from the group Rhode Island Vegan Awareness at their annual summer picnic are waiting for after trying them…

photo (6)

Ingredients for the syrup:

  • 6 oz fresh raspberries or 1 cup defrosted frozen raspberries
  • Juice of one lime
  • Zest of one lime
  • 1 cup evaporated cane juice

Ingredients for the drink:

  • 1 cup lime club soda or seltzer (or plain, even)
  • 3-6 ice cubes
  • Lime wedges for garnish

Directions for syrup:

  1. Place ingredients in a saucepan on low heat.
  2. Continuously stir for at least 15 minutes until bubbling and starting to thicken. The raspberries will no longer be whole at all and it will be bubbling quite a bit.
  3. Strain the seeds with a bowl or large measuring cup underneath. Stir with the spoon you used to get all the syrup out. It makes about a half a cup.
  4. Chill before using in a drink, and definitely try it in my raspberry lime rickey cupcake recipe, which I will be posting next Tuesday, September 16th!

To assemble the Rickey (for one drink)

  1. Pour the soda into a glass.
  2. Mix in 2 tbsp of the syrup. Add more sweetener if desired (I have a sweet tooth and added some stevia extract to mine)
  3. Put the ice into the glass and garnish with lime wedges around the glass’ rim.

850X315_g3_fb-1

Vegan New England Style “Lobstah” salad made from hearts of palm and 7 days of new smoothie recipes to share!

Hello everybody, 

I did this thing this past week that I was going to blog about. Unfortunately I got a new laptop and when I transferred all the pictures I had  from my phone to my laptop, (including the ones I needed to make the blog entry) some of them got lost in the shuffle. I tried a new smoothie recipe every day of the week, and wanted to talk about them. Instead, lacking pictures, I will post the links to the recipes I used at the end of this entry.

I do however have a picture for the recipe I am about to share!

Growing up in the New England area of the East Coast United States, lobster salads have always been a thing. They’re also usually kind of a big treat. Today I was inspired by that, and wanted to make a vegan version. This is truly “lobstah” as Bostonians and Rhode Islanders would say, but is free from any cruelty towards the real sea creatures.

I used hearts of palm as the main “meat,” and some sun-dried tomatoes as well to give color, flavor, and texture. There is a mix of seafood-y spices, lemon juice, and other seasonings, and the mix of vegenaise and vegan sour cream makes a delightfully creamy dressing for it.

New England Vegan Hearts of Palm “Lobstah” Salad

Image


Ingredients:

  • 2 cans salad chopped hearts of palm, drained, placed in a food processor and pulsed a few times to further chop them
  • 1/2 cup julienned cut sun dried tomatoes (the kind that comes in a bag, not packed in oil. I’d actually recommend soaking these in warm water for an hour or until a bit softer prior to including them in the salad because I didn’t and some were chewier and a bit tough when I ate them…soaking would solve that problem, but is probably optional)
  • 1 tsp kelp granules
  • 1/2 tsp paprika
  • 1 tsp dill
  • 1/4 tsp old bay seasoning
  • 1 tsp onion powder
  • 1/4 tsp black pepper (use less if placing on top of greens instead of on bread)
  • 1/4 tsp white pepper
  • 1/4 tsp salt
  • 1 tbsp lemon juice
  • 1/2 cup vegenaise
  • 1/2 cup vegan sour cream (I used tofutti)

Directions:

  1. Place chopped, drained, and processed hearts of palm in a mixing bowl or other large container.
  2. Add sun-dried tomatoes and stir.
  3. Add spices and take a spoon to mix them into the chopped hearts of palm and sun-dried tomatoes. Make sure they are evenly coated.
  4. Add lemon juice, vegenaise, and sour cream and stir. 
  5. Serve in a bun with some crunchy lettuce, or on top of salad greens with whatever other toppings you desire.
  6. Enjoy!


So there is that! Now as promised, here is the list and links to the smoothies I made each day last week:

  1. Raspberry Lime Zinger from Oh She Glows *Second place in my favorites!
  2. Pumpkin Chai from The Sweet Life
  3. Key Lime Pie Green Smoothie from Healthful Pursuit
  4. Pina Colada Smoothie from Foodie with Family
  5. Orange Creamsicle Smoothie (also from The Sweet Life) *My favorite one I tried!
  6. Chocolate Strawberry Almond Protein Smoothie from The Healthy Family and Home
  7. Chamomile Strawberry Quinoa Smoothie from Apron and Sneakers *Runner up for favorite 🙂